Monday, October 31, 2022

Inspired Christmas Scottie Fun Fold

The Christmas Scottie Bundle is quickly becoming one of my favorites.  I love this fun little stamp set.  The dog images are so cute and I love their little accessories like their bows and gifts.  I'm also featuring the Sweetest Christmas DSP, I didn't love this DSP at first, but the more I've used it the more and more I love it!  I'm using two of my favorite patterns today!

stampin up, christmas scottie

This is a fun fold card that was inspired by this post by fellow demonstrator Marisa.  This is an easy fun fold and it's a great fun fold to use up all that DSP I know you're holding onto.  The card base is 5 1/2" x 5 1/2", score on one side at 4 1/4" to create your card base.  Then grab some DSP pieces, I used two pieces that are 5 1/4" x 1" and two that are 5 1/4" x 4".  

stampin up, christmas scottie

I adhered my larger DSP pieces back to back for two reasons: One I wanted the same pattern on the inside and the outside, two I wanted my card front to be a little more sturdy than just on piece of DSP.  The adhesive and the extra DSP add to that sturdiness.  The two smaller DSP pieces are adhered on the inside and outside of the card.  I have lots of pups and fun stamped accents on the front of the card and the back.  They're so cute!  I have a full supply list below.  You can shop for these products in my Online Store.  

stampin up, christmas scottie


Sunday, October 30, 2022

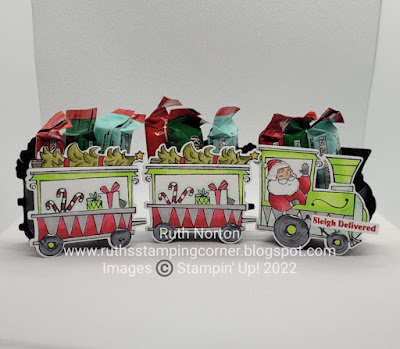
Twelve Weeks Of Christmas Week 5-Santa's Delivery Train Car Kit Kat Boxes-VIDEO

I am so so soooooo excited to share this project with you today!  This project has been in my head for a while and I'm so glad that when I finally got the chance to sit down and make it I was so pleased with the results.  Today we're using the Santa's Delivery Bundle to make ADORABLE train engine/car boxes!  These are sized to hold little Christmas Kit Kats but they'll hold any number of treats; mints, Hershey Kisse's/Nuggest, M & M's, etc.

stampin up, santa's delivery

There are multiple ways that you can customize these boxes to suit you.  Have a large family? Make as many train cars as you need!  Your train can be as long or as short as you want!  My vision for this is that you can line the center of your dinner table with these cute cars and everyone gets a car at the end of dinner.  So fun!  Because I plan to use them down the center of my table where both sides will be seen I have the same image stamped on both sides.  I know you're thinking "that's not a symmetrical image, how did you get the image to face the opposite direction?"  I did some reverse stamping to solve that.  

stampin up, santa's delivery

Reverse Stamping is easier than you might think.  That's where your Stamparatus comes in super handy!  You'll need your Stamparatus and a Silicone Craft Sheet, both are sold in my Online Store.  Place your Silicone Craft Sheet into your Stamparatus and stamp onto the Silicone Craft Sheet with Memento.  I stamp on it twice.  You don't have to do it twice but I find I get slightly better coverage with two layers of ink.  Once you have your ink on your Silicone Craft Sheet carefully place a piece of Basic White onto the craft sheet over the ink and press down and stamp your image again.  Carefully remove your Basic White Cardstock and you'll have the image stamped in the reverse direction!  I demonstrate this in my video so make sure you check out my video for full instructions and more details on this technique.  

If you're planning on displaying the train on a buffet or somewhere where only one side will be shown you don't need to stamp and die cut the reverse to each engine/car.  Save yourself half the work! 

stampin up, santas delivery

I die cut and colored all my images with Stampin' Blends, all colors are listed below in the supply list..  I also die cut the engine and cars with Basic Black and adhered my colored images to the Basic Black Cardstock.  I did this for two reasons, it makes the box more sturdy with an additional layer of cardstock and it hides all the bleed through from the Stampin' Blends giving you a cleaner finished product.  I finished up all my wheels with some Black Pearlized Enamel Effects.  I love the shiny texture this gives.  I also used the White Pearlized Enamel Effects for Santa's hat. 


The boxes behind the train engine and the train cars are the same measurements, so making multiples of them is quick and easy.  You'll need to make as many boxes as you plan to have engines/cars.  Each box is:

Basic Black 3" x 4" score at 1" on all four sides

I have a full supply list below you can shop for these products in my Online Store.  Make sure you check out my video for all the details on my boxes and the tips on reverse stamping.  Subscribe to my YouTube Channel while you're there so you never miss a video.  

stampin' up, santa's delivery


Friday, October 28, 2022

Card Crate November 2022-Framed and Festive Set Notecards and Box Gift Set

I am happy to announce a new way to do classes with me!  Welcome to Card Crate!  The class that comes to your door and you can do your projects on your time from the comfort of your home.


Card Crate is $35 (includes shipping!)

You'll get:

  • Supplies for your projects
  • A PDF with all the supplies and photos of projects
  • $20 in product, needed to complete your cards
  • A Thank You gift from me
  • Video Tutorial

What you'll need:
  • Stamps and ink to complete your projects, per Stampin' Up! policy all projects will come unstamped (you'll know in advance what the supplies are so you can plan ahead and place orders if you need to).  There's always room to substitute items and be creative if you don't have the exact supplies!
  • Adhesive, some months may contain specialty adhesive.
  • Scissors
How to purchase:
Email me and let me know you want the November Card Crate and I'll send you a link to pay via PayPal.  Per Stampin' Up! Policy I cannot list the 'buy now' button on my blog.
Please email me if you want the Card Crate stamperrdn@q.com

Last day to RSVP for November's Card Crate is November 9.  Payment is due on November 9.  All supplies will be ordered on November 10 and classes will ship by November 25.  (Time between ordering and shipping is longer due to longer expected shipping from Stampin' Up!, I hope to have them out sooner but I'm overestimating on timelines to be safe.)  You will receive an email with your PDF when all crates have shipped.


This month's kit is festive and makes a great gift!! I'm featuring the Framed and Festive Set.  You'll make 6 cards and the gift box.  One card is a fun fold card, one card has a fun gift card holder inside the card.  You'll have plenty of supplies to make even more cards!  You will need the stamps to complete the cards.  Add on the set for $23, I'll pay the tax and shipping.  

Make sure you indicate that you'll need the set when your RSVP for Card Crate.  NOTE: You WILL need the stamps to create the cards. 


This month's Card Crate you'll make 6 notecards and a fun box to store them in or gift them away all featuring the Framed and Festive Set.

What you'll get in this month's kit:

  • Supplies for your 6 projects and box 
  • Full package of Kraft Note Cards and Envelopes
  • Full package Linen Thread
  • Half package of Fitting Florets DSP trimmed to 12" x 6"
  • PDF Instructions with photos and measurements
  • Video Tutorial
  • Free Gift

What you'll need to complete this month's kit: 

All other supplies for your cards will come in your kit.  Your kit may contain die cut, pre punched or pre dry embossed pieces.  You will need to supply all stamps and inks to complete your project.  If you don't have the supplies listed above you can place an order to get them or you can substitute what you do have.  There is always room for to be creative.  

If you have any questions please let me know.  I hope you enjoy this month's Card Crate!!
 

Wednesday, October 26, 2022

Sunflower Dies Cookie Box

Today I'm sharing a fun and quick box with you!  This one is simple enough to make a stack of them, festive enough for fall and cute enough for everyone!  I'm featuring the Sunflower Dies from our Annual Catalog.  These dies are some of my favorite dies for fall, I even love to bring them out in the spring too, but especially in the fall.  This sunflower die is so big and spectacular.  The die is almost 3 1/2", it makes an amazing focal point for a card or box.  

stampin up, sunflower dies

For my sunflower I die cut the base in So Saffron, the detail in Crushed Curry.  I added some Adhesive Sheets on the back of my Crushed Curry piece, this makes adhering it down a breeze!  The center of my flower is Crumb Cake and Early Espresso.  The greeting on my box is from the new Framed Florets Set.  This set is available only to demonstrator right now, but you can join my team now and add it to your starter kit and get it now!  It will be available on November 1 to everyone.  

stampin up, sunflowers dies

My box is an open top box with some angle sides.  I think it's a fun and quick way to gift anything, today I have a mini package of cookies.  I got a box of these cookies at Sam's Club, there's 24 cookie packs in the box, lots of treats ready to go!  I used a punch to string some Early Espresso Ribbon through to hold those cookies nice and secure.  I punched a hole in the center on the back and threaded the ribbon through the hole around the bottom to the top and tied a bow.  It makes it extra cute and holds your treat nice and secure.   

stampin up, sunflowers dies

The box is simple to make, you'll need:

Crumb Cake 5" x 5"
On one side score at 1 1/2" and 2 1/2"
On the other side score at 1" each side

Make sure you check out my video for all the details.  While you're there make sure to subscribe to my YouTube Channel so you never miss a video.  I have a full supply list below, you can shop for these products in my Online Store.  

stampin up, sunflowers dies


Tuesday, October 25, 2022

Artistically Inked Birthday

Every few months I need a new stack of birthday cards.  I try to be good at sending them out regularly, but in all honesty some months are harder than others.  But I know I have a bunch of birthdays coming up this month and next so I wanted to make sure my birthday card stash was well stocked.  I pulled out a set that I've had forever but have never really used.  I don't even know why I haven't used it.  It's STUNNING!  I'm talking about the Artistically Inked Set.  I've used the greetings in this set a lot.  This birthday greeting is one of my favorites.  But I had never inked up the background stamp.  I was blown away, I can't believe I've waited this long!  

stampin up, artistically inked

I stamped my background in Starry Sky and I'm in love!  The flower is stamped in Mango Melody and the leaves and smaller flowers are Bermuda Bay.  Isn't this an amazing color combo!?  My card base is the standard 8 1/2" x 5 1/2" scored at 4 1/4".  The Starry Sky piece is 4" x 5 1/4" and my Basic White piece is 3 3/4" x 5".  It took a couple of minutes to trim the cardstock pieces, then stamping and assembling was quick and easy.  I have a full supply list below.  You can shop for these products in my Online Store.   

stampin up, artistically inked


Monday, October 24, 2022

All Bundled Up Twist and Pop Card

Today I have another fun Twist and Pop Card to share with you!  If you missed yesterdays post make sure you go back and check it out here.  I have all the details on the twist and pop technique for you plus a video walking you step by step through the process to make one.  It's an incredible card to make, sure to bring a smile to anyone who gets it.  The card I'm sharing today uses lots of the same supplies, the same Knit Together Background, Wonderful Snowflakes, even some similar colors, as yesterdays but with a different stamp set.  For this card I used the All Bundled Up Set.  I love these cute critters!  

stampin up, all bundled up

I used Stampin' Blends to color my images, all the colors are listed below in the supply list.  I kept my front fairly simple.  The coloring took the longest.  I used my Stamparatus to get a good image from the Knit Together Background.  I love using my Stamparatus for background stamps, it's a great way to get a perfect image. 

stampin up, all bundled up

Inside my card I have that fun pop up panel where I added more of those images from the All Bundled Up Set.  If you want more information on how to make the twist and pop card check out yesterdays post here for more details and a video.  Measurements for this card are listed below.  I have a full supply list below, you can shop for these products in my Online Store.  

Card Base-Tahitian Tide-8 1/2" x 5 1/2"
Score the long side at 4 1/4"

Mechanism-Tahitian Tide-2 1/2" x 5 1/2"
On the short side score at 1 1/4"
On the long side make marks on the top and bottom at 1 1/2" from each side.  Score diagonally from the mark on the top left to the bottom right and on the bottom left to the top right.  

Pop Up Panel-Tahitian Tide-8" x 2 3/4"

Panel Layers-Four Basic White-2 1/2" x 1 3/4"

Front Layers: Flirty Flamingo-5" x 3 3/4", Basic White-3 1/4" x 4"

stampin up, all bundled up


Sunday, October 23, 2022

Twelve Weeks Of Christmas Week 4-Twist and Pop Penguin Place Card-VIDEO

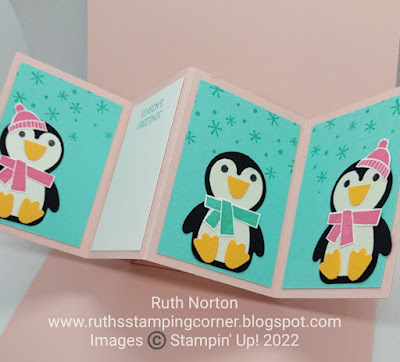
I have a really fun card to share today!  You will love this card, trust me it looks more complicated than it is.  In my video I'll break down step by step how easy it is to make this twist and pop card, but we'll get to the twist and pop part in a minute.  Today I'm using the Penguin Place Set and Penguin Builder Punch.  These were available in last years Holiday Catalog, they were carried over into this years and I'm so glad.  This is one of my absolute favorite builder punches!  Plus there's lots of greetings in this set that can carry you beyond Christmas.  It's so good!  I used the Knit Together Background Stamp for the background.  This is another one of my favorites!  

stampin up, penguin place

The Penguin Builder Punch is pretty fantastic on it's own but I love to use the set with it because of all the fun accessories for the penguins.  For my card I'm keeping it simple with the hat, scarf and gifts.  You could go all out with this set though!  It just depends on how detailed you want to get.  For my card you'll need five penguins and any accessories they want/need.  I used the punch for the penguin beak too, it's the feet, I just trimmed off the toes.  Their bodies are punched from the Pearlescent Paper to give them a little shimmer and sparkle.  There are no dies or punches for the accessories but they're pretty easy to trim out.  

stampin up, penguin place

Let's talk twist and pop now!  This card is so amazing because when you open it there's a mechanism inside that will twist up then pop open!  It's so fun!  I promise your friends and family will open and close this card over and over again to watch the magic!  

stampin up, penguin place

The inside portion has four panels.  I have three more penguins inside then a panel to write a short note or sign your name.  You could also do some writing on the inside of the card above or below the pop up panel too.  The real magic is the panel on the inside.  

stampin up, penguin place

Here's all the measurements you'll need to create this card.  Please watch the video for details and tips.  Feel free to slow down the video and pause it if you need to.  I'm listing the colors I used on mine for reference.

Card Base-Blushing Bride-8 1/2" x 5 1/2"
Score the long side at 4 1/4"

Mechanism-Blushing Bride-2 1/2" x 5 1/2"
On the short side score at 1 1/4"
On the long side make marks on the top and bottom at 1 1/2" from each side.  Score diagonally from the mark on the top left to the bottom right and on the bottom left to the top right.  

Pop Up Panel-Blushing Bride-8" x 2 3/4"

Panel Layers-Three Coastal Cabana, One Basic White-2 1/2" x 1 3/4"

Front Layers: Coastal Cabana-5 1/4" x 4", Polished Pink-5" x 3 3/4", Basic White-5 1/4" x 2"

Check out the video for details.  While you're there subscribe to my YouTube Channel so you never miss a video.  I have a full supply list below.  You can shop for these products in my Online Store.  Check my blog tomorrow for another fun version of this card!  

stampin up, penguin place


Friday, October 21, 2022

Simply Fabulous Nugget Box-VIDEO

If you liked this fun Hershey Nugget treat packaging I shared last week you'll love this one too!  Hershey Nuggets are a great affordable treat option especially when you have lots of treats to make!  They're cute and there are so many options out there to package them up adorably.  Today I have another option to share.  This fun box holds three Hershey Nuggets and is super cute!  Perfect for anyone that needs a boost of chocolate!  

stampin up, simply fabulous

I'm using the Simply Fabulous Set today.  I love this set.  I've used it quite a bit in the past too.  There are no dies or punches but the images are so great and there's greetings for nearly any occasion.  

stampin up, simply fabulous

I kept my stamping pretty simple.  I did some stamping on my tag, die cut from the All That Dies and a greeting also with dies from the All That Die Set.  I did fussy cut one flower.  If you didn't want to fussy cut a flower you could easily swap that out for a bow of twine or ribbon.  My belly band is a piece of DSP from the Happy Forest Friends Pack.  There's lots of good patterns in that one!  The nuggets are also wrapped in a pattern from that DSP too.  

stampin up, simply fabulous

To make the box you'll need a piece of Calypso Coral that is 6 1/2" x 3 3/4"
On the long side score at 1/2" and 1 1/8" from each side
On the short side score at 1/2", 1 1/2", 2 1/8" and 3 1/8"

DSP is 3" x 4"

Hershey Nuggets DSP wraps (three) 3" x 1"

I have a full supply list below.  You can shop for these products in my Online Store.  Check out the video for details on this cute box.  Make sure you subscribe to my YouTube Channel so you never miss a video.  

stampin up, simply fabulous

 Shop my Online Store.