Monday, February 28, 2022

Gorgeous Grape Gumball Shaker Card-VIDEO

I'm sooooooo excited to share this card with you today!!  Last week I shared another gumball shaker card that was pretty similar to this card.  Let's face it, it was basically identical except the color.  That's ok!  You can copy yourself-I do it all the time!  I wanted to recreate this card, this time with a video to share how to put all these dies together.  This bundle is so amazing and so well thought out.  However to a newer stamper it might look a little too intimidating.  I get it.  After doing this for almost 19 years, sometimes the fancy dies still make me take a second look at them.  So I hope I can walk you through the process of this card and maybe take the guesswork out of it for you.  

stampin up, gumball shaker

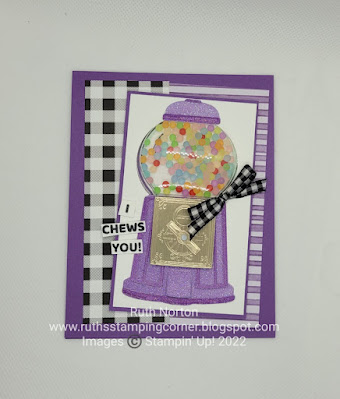
If you saw the card I posted last week, you'll notice there are really only two changes to this card.  The color, this one is in Gorgeous Grape, last week I did it in Poppy Parade.  And the DSP, I switched out one of the patterns in the Pattern Party Host DSP for the Sweet Talk DSP to better coordinate with my Gorgeous Grape.  I have to say I'm LOVING the purple!  I thought I'd for sure pick the Poppy Parade over Gorgeous Grape but I love this one!!!  You'll have to let me know which you like better.

stampin up, gumball greetings

Just like the Poppy Parade one, for this card I used the Ombre Specialty Paper for my machine.  This paper isn't really glimmer paper but it does have plenty of sparkle and shine!  For my detailed pieces I used an adhesive sheet on the back of my Ombre Specialty Paper, this is a life saver when it comes time to adhere the pieces!  I have a full supply list below, you can shop for these products in my Online Store.  Make sure you check out my video for all the details on this card plus subscribe to my YouTube Channel while you're there.  

Gorgeous Grape 11" x 4 1/4" score long side at 5 1/2", another piece at 2 3/4" x 4 1/2" Pattern Party DSP 5" x 1 3/4" Sweet Talk DSP 5" x 3" Basic White 2 5/8" x 4 3/8"

Thanks for looking, see you soon!!!

Supplies:


Sunday, February 27, 2022

Island Vibes Multi Colored Stamping With Stamparatus-VIDEO

Today I'm wrapping up my Sale-a-Bration Celebration Series.  Monday February 28, 2022 is the LAST day to get your favorite Sale-a-Bration items.  Once they're gone, they're gone.  Today I have one last project with the Island Vibes Set.  I love this card!  The bright colors really call my name!  I love all the multicolored pineapples too!  I'll share how easy it is to do with the Stamparatus in my video.  Check it out below, and make sure to subscribe to my YouTube Channel.  

stampin' up, island vibes

I love the soft backgrounds.  I started with some Basic White Cardstock, Coastal Cabana Ink and a Blending Brush and covered the background as well as the three smaller pieces with a light coat of ink.  Remember when you're adding ink with a Blending Brush use a light pressure.  You can always add ink, but you cannot take it away.  I finished my card with a stamped greeting, some Simply Elegant Silver Trim and some gorgeous Rhinestone Waves Jewels.  The rhinestones will be available on March 1 along with the Waves of the Ocean Promotion.  I have a full supply list below, you can shop for these products in my Online Store.  Check out details on this card in my video. Subscribe to my YouTube Channel so you never miss a video.   

Coastal Cabana 8 1/2" x 5 1/2" score long side at 4 1/4"
Basic White 5 1/4" x 4" (two pieces), 1 1/2" x 3" (three pieces), scrap for greeting

stampin up, island vibes

Shop my Online Store
Thanks for looking, see you soon!!!

Supplies:
Rhinestone Waves Jewels-available March 1
Other-Post It Notes


Thursday, February 24, 2022

Card Crate March 2022-Inspired Thoughts Bundle

I am happy to announce a new way to do classes with me!  Welcome to Card Crate!  The class that comes to your door and you can do your projects on your time from the comfort of your home.


Card Crate is $35 (includes shipping!)

You'll get:

  • Supplies for your projects
  • A PDF with all the supplies and photos of projects
  • $20 in product, needed to complete your cards
  • A Thank You gift from me
  • Video Tutorial

What you'll need:
  • Stamps and ink to complete your projects, per Stampin' Up! policy all projects will come unstamped (you'll know in advance what the supplies are so you can plan ahead and place orders if you need to).  There's always room to substitute items and be creative if you don't have the exact supplies!
  • Adhesive, some months may contain specialty adhesive.
  • Scissors
How to purchase:
Email me and let me know you want the March Card Crate and I'll send you a link to pay via PayPal.  Per Stampin' Up! Policy I cannot list the 'buy now' button on my blog.
Please email me if you want the Card Crate stamperrdn@q.com

Last day to RSVP for March's Card Crate is March 11.  All supplies will be ordered on March 12 and classes will ship by March 21.  (Time between ordering and shipping is longer due to longer expected shipping from Stampin' Up!, I hope to have them out sooner but I'm overestimating on timelines to be safe.)  You will receive an email with your PDF when all crates have shipped.  


This month's kit is so pretty, these dies are amazingl!!!  I'm featuring the Inspired Thoughts Bundle.  We are making gorgeous spring and summer trees but don't discount this set for fall and winter.  This is a great year round bundle to own.  Add on the Inspired Thoughts Bundle to your Card Crate for only $45.75 and I'll pay the tax and shipping on it!!  Make sure you indicate that you'll need the bundle when your RSVP for Card Crate.  NOTE: You WILL need the stamps and dies to create the projects.  


This month's Card Crate you'll make 4 amazing cards with the Inspired Thoughts Bundle! 

What you'll get in this month's kit:

  • Supplies for your 4 projects
  • Package of Essentials Baker's Twine
  • Pack of Rhinestone Waves Basic Jewels
  • Pack of Mini Dimensionals
  • PDF Instructions with photos and measurements
  • Video tutorial
  • Free Gift

What you'll need to complete this month's kit:

All other supplies for your cards will come in your kit.  Your kit may contain die cut, pre punched or pre dry embossed pieces.  You will need to supply all stamps and inks to complete your project.  If you don't have the supplies listed above you can place an order to get them or you can substitute what you do have.  There is always room for to be creative.  

If you have any questions please let me know.  I hope you enjoy this month's Card Crate!! 


Abstract Beauty Cards

The Abstract Beauty Suite is one of my favorites in the Mini Catalog.  The colors are the best! Plus I love that abstract watercolor design.  If you're looking for an easy way to make some gorgeous quick cards, check out the products in that suite.  Today I'm going to showcase the Abstract Beauty Cards and Envelopes and the Abstract Beauty Ephemera Pack.  

stampin up, Abstract Beauty Cards and Envelopes, Abstract Beauty Ephemera Pack

I added a little bit of stamping with the Hello Beautiful Stamp Set.  Almost all of the fun pieces and embellishments come from the ephemera pack.  The cards are already beautiful and all you need to do is add a greeting and some image.  

stampin up, Abstract Beauty Cards and Envelopes, Abstract Beauty Ephemera Pack

There are endless options to what you can do with these cards.  I had so much fun sitting down with the cards and ephemera pack and just getting creative.  I love the gold accents, I love the watercolored cards. There are so many options!  

stampin up, Abstract Beauty Cards and Envelopes, Abstract Beauty Ephemera Pack

Even after I made these four cards I still had lots of card bases left and lots of the ephemera pack left.  Perfect for another day of crafting!  Check out the products in the Abstract Beauty Suite!  I think you'll love them!  I have a full supply list below.  You can shop for these products in my Online Store. 

stampin up, Abstract Beauty Cards and Envelopes, Abstract Beauty Ephemera Pack

Thanks for looking, see you soon!!!

Supplies:


Wednesday, February 23, 2022

Catch You Later Slider Easel Box-VIDEO

I'm so excited to share this box with you!  It is a cute slider box.  It opens like a box of matches.  But the top has a fun surprise!  I'm using the Catch You Later Set from the Mini Catalog.  These fun images and silly puns are right up my alley.  I love anything with a cute critter!  That's totally my style!  

stampin up, catch you later

I colored my sweet monkeys with Stampin' Blends.  I used Soft Suede, Crumb Cake and Flirty Flamingo for the monkeys, for my branch I used Granny Apple Green.  I used DSP on the sides from the Pattern Party DSP pack.  This it a huge package of DSP that can only be earned with Stampin' Rewards Dollars with orders over $150.  It's one of my favorite DSPs!!! The rhinestones on my card are from the new Rhinestone Waves collection coming in March!  

stampin up, catch you later

The top is so special! The card on top pop up and you can stand it up just like any easel card.  I just love that fun feature.  I added a stamped tag on the inside using the Tailor Made Tags Dies.  The tag is adhered with Dimensionals.  This gives it the dimension to hold up the front of the card.  So cute!!  

stampin up, catch you later

For some extra pizzazz I added some ribbon to the tag on the inside.  This makes the card/box sooooo cute when it's displayed.  I started with some White Seam Binding Ribbon and used my Granny Apple Green Stampin' Blend to color the ribbon for a custom color.  I love doing this with our White Seam Binding Ribbon.  

stampin up, catch you later

To keep my card closed I used some of the Crumb Cake Baker's Twine in our Essential Baker's Twine package.  It also gives the box a finished look.  Inside my box I put a hostess cupcake.  This is a great box to share with friends, coworkers, neighbors or anyone celebrating a birthday!  

stampin up, catch you later

Here's all the measurements.  Make sure you watch the video below for all the details, there's lots of pieces! 
Box
7 1/2" x 7 1/2" score at 1" and 2 1/4" on each side
Outside Sleeve
3 1/16" x 9 1/4"
Score the long side at 3 1/16", 4 3/8", 7 7/16" and 8 3/4"
Card
3" x 6" 
Score long side at 1 1/2" and 3"
Card Layers
2 3/4" x 2 3/4" Granny Apple Green
2 1/2" x 2 1/2" Basic White
DSP 
four pieces 3" x 1 1/4"

I have a full supply list below.  You can shop for these products in my Online Store.  Make sure you subscribe to my YouTube Channel so you never miss a video.  

stampin up, catch you later

Shop my Online Store.
Thanks for looking, see you soon!!!!

Supplies:
Rhinestones Waves-Available March 1, 2022


Monday, February 21, 2022

Gumball Shaker Card

Today's card is case of two weeks of debating with myself.  I loved the Gumball Greetings Bundle when I saw it and thought it was sooooo cute but I wasn't sure how much I would use it so it got pushed to the bottom of my wishlist.  Then I saw a million, maybe not a million but a lot, of samples with it and thus the debate started. No you don't need it, yes I do need it, no, yes, no, yes.  Well obviously the yes's won.  We knew they would.  I'm so glad I got it!  Because it is SOOOO cute!!!  

stampin up, gumball greetings

Once I decided I was all in, I went for it all! The bundle, the Shaker Domes and the Frosted Beads.  Once you get the bundle and add on the domes and beads you qualify for a free Sale-a-Bration item (only through February 28, 2022). I'm not gonna sugar coat it, there's a lot of die, a lot of little pieces and it can be a little finicky to put together.  But I used Adhesive Sheets on all the detail pieces and that helped a ton!  For my gumball machine I used Ombre Specialty Paper, in the red ombre sheet.  So there's some glitter and sparkle to the machine.  My metal piece is cut out of Brushed Metallic Cardstock and with the help of a brad the turning part really turns! The slot that the gumballs come out actually opens too! This bundle is so well thought out!  

stampin up, gumball greetings

Shaker cards are always a hit!  I have never met a person who doesn't love a shaker card.  It doesn't matter your age, shaker cards are always impressive!  There's very little stamping on this card.  I stamped the greeting and the glass details.  I used my Pool Party Stampin' Blends to add a little shading to the glass detail inside the shaker.  It's a small detail but makes a big difference.  If you want to see a video of how to use the dies and make a gumball shaker let me know in the comments.  I'd love to share this in a video!  I have a full supply list below, you can shop for these products in my Online Store. 


Thanks for looking, see you soon!!!

Supplies:


Sunday, February 20, 2022

Simply Marbleous and Special Moments Belly Band Box-VIDEO

We have reached the final days of Sale-a-Bration.  There's just about a week left to shop and join and get all those amazing Sale-a-Bration perks!  When you shop my Online Store, for every $50 you spend you can choose a free Sale-a-Bration product.  Some products can only be earned with a $100 order but you can't go wrong with any of the choices!  If you have a long wishlist consider joining my team!  Joining is easy and for only $99 you choose $125 in product PLUS you get to choose two free stamp sets in addition to your $125 in product!  PLUS you'll get free shipping on your kit and a free Paper Pumpkin in your kit!  It's a fantastic deal! There are no obligations to buy or sell.  Simply enjoy your discount and perks as a demonstrator! But HURRY!  These deals end when Sale-a-Bration ends on February 28!

stampin up, simply marbleous, special moments

Today I'm using two of the Sale-a-Bration products you can choose for free!  I'm using the Simply Marbleous DSP and the Special Moments Stamp Set.  The DSP you can earn free with a $50 order the stamp set is bigger and you can only earn that free with a $100 order.  Both are great picks!  You can't go wrong with either, or both!  

stampin up, simply marbleous, special moments

The box I have today is so cute!  It's fold over lidded box with a fun belly band to keep it closed.  The belly band is made from the Simply Marbleous DSP.  I have pictures of the Flirty Flamingo version, in the video I'll share a Bumblebee version.  There's lots of options with this DSP!  I used a greeting from the Special Moments set for my tag and my flower and leaf are punched with more of the Simply Marbleous DSP.  The flower is made is punched with the Flowers and Leaves Punch in the Annual Catalog.  The leaves are made with the Ladybug Punch in the mini catalog.  I love when a punch can pull double duty and the ladybug punch is a winner!  

stampin up, simply marbleous, special moments

The box is made with cardstock that is 
11" x 3"
On the long side score at 3 1/2", 4", 8" and 8 1/2"
On the short side score at 1/2" on each side
The belly band is 6" x 2"
The cardstock layers on the front are 1 7/8" x 3 3/8" and 1 7/8" x 2 3/8" both embossed with the Ornate Floral Embossing Folder.  

Inside my box, I have a couple instant coffee packs.  The perfect gift for your coffee loving friends!  I have a full supply list below.  You can shop for these products in my Online Store.  Check out the video for details on this box.  Subscribe to my YouTube Channel while you're there.  

stampin up, simply marbleous, special moments

Thanks for looking, see you soon!!!!!!!

Supplies:
other: 1/2" Circle Punch


Saturday, February 19, 2022

Awesome Otters Stamp a Stack-VIDEO

Welcome to my Awesome Otters Stamp A Stack!  If you purchased the kit you can refer back to this blog post for pictures and further instructions.  Make sure to also catch the replay of the class below.  If you didn't get the class kit not to worry you can still create these amazing cards!  

stampin up, awesome otters

If you don't have the Awesome Otters Set I'm also sharing options with the Nuts and Bolts Set and the Happy Hedgehog Bundle.  The card supplies and layouts are all the same.  The only thing altered is the images and greetings.  

stampin up, nuts and bolts

Prior to the class I provided a PDF with prep work to do before the live video in my Facebook group.  You'll need to trim your DSP.  Stamp, color and fussy cut/punch your images.  Tie your bows for each card.  You can check out the prep work PDF here.  

stampin up, happy hedgehogs

The class kit included the DSP, plus LOTS of extras for other projects, half a package of Genial Gems and 3 yards of the White Seam Binding Ribbon.  Plus all the other card supplies you'll need for each card.  

stampin up, awesome otters

The class kit made two of each card, six cards total.  The Sunshine and Rainbows DSP and the Awesome Otters Set are both Sale-a-Bration items you can choose for free with a qualifying order through the end of February or while supplies last.  

stampin up, nuts and bolts

I love how well the Sunshine and Rainbows DSP coordinates with so many sets!  All the cards shared similar supplies.  You can shop for all the supplies in my online Store. 

stampin' up, happy hedgehogs

Make sure to check out my video for details on the cards.  In the video I only demonstrate the otter cards but the Nuts and Bolts and Happy Hedgehog cards are made the same way.  


stampin up, awesome otters


stampin up, nuts and bolts


stampin' up, happy hedgehogs

Happy Hedgehog Cards:

Check out the class video and subscribe to my YouTube Channel.

Thanks for looking, see you soon!!!!