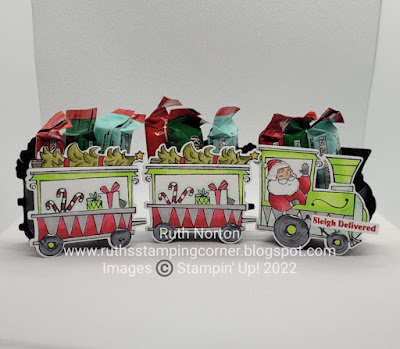
I am so so soooooo excited to share this project with you today! This project has been in my head for a while and I'm so glad that when I finally got the chance to sit down and make it I was so pleased with the results. Today we're using the Santa's Delivery Bundle to make ADORABLE train engine/car boxes! These are sized to hold little Christmas Kit Kats but they'll hold any number of treats; mints, Hershey Kisse's/Nuggest, M & M's, etc.
There are multiple ways that you can customize these boxes to suit you. Have a large family? Make as many train cars as you need! Your train can be as long or as short as you want! My vision for this is that you can line the center of your dinner table with these cute cars and everyone gets a car at the end of dinner. So fun! Because I plan to use them down the center of my table where both sides will be seen I have the same image stamped on both sides. I know you're thinking "that's not a symmetrical image, how did you get the image to face the opposite direction?" I did some reverse stamping to solve that.
Reverse Stamping is easier than you might think. That's where your Stamparatus comes in super handy! You'll need your Stamparatus and a Silicone Craft Sheet, both are sold in my Online Store. Place your Silicone Craft Sheet into your Stamparatus and stamp onto the Silicone Craft Sheet with Memento. I stamp on it twice. You don't have to do it twice but I find I get slightly better coverage with two layers of ink. Once you have your ink on your Silicone Craft Sheet carefully place a piece of Basic White onto the craft sheet over the ink and press down and stamp your image again. Carefully remove your Basic White Cardstock and you'll have the image stamped in the reverse direction! I demonstrate this in my video so make sure you check out my video for full instructions and more details on this technique.
If you're planning on displaying the train on a buffet or somewhere where only one side will be shown you don't need to stamp and die cut the reverse to each engine/car. Save yourself half the work!
I die cut and colored all my images with Stampin' Blends, all colors are listed below in the supply list.. I also die cut the engine and cars with Basic Black and adhered my colored images to the Basic Black Cardstock. I did this for two reasons, it makes the box more sturdy with an additional layer of cardstock and it hides all the bleed through from the Stampin' Blends giving you a cleaner finished product. I finished up all my wheels with some Black Pearlized Enamel Effects. I love the shiny texture this gives. I also used the White Pearlized Enamel Effects for Santa's hat.
The boxes behind the train engine and the train cars are the same measurements, so making multiples of them is quick and easy. You'll need to make as many boxes as you plan to have engines/cars. Each box is:
Basic Black 3" x 4" score at 1" on all four sides
I have a full supply list below you can shop for these products in my Online Store. Make sure you check out my video for all the details on my boxes and the tips on reverse stamping. Subscribe to my YouTube Channel while you're there so you never miss a video.
Check out my other Twelve Weeks Of Christmas Projects
Supplies:


No comments:
Post a Comment