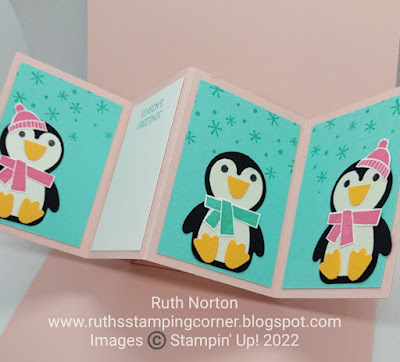
I have a really fun card to share today! You will love this card, trust me it looks more complicated than it is. In my video I'll break down step by step how easy it is to make this twist and pop card, but we'll get to the twist and pop part in a minute. Today I'm using the Penguin Place Set and Penguin Builder Punch. These were available in last years Holiday Catalog, they were carried over into this years and I'm so glad. This is one of my absolute favorite builder punches! Plus there's lots of greetings in this set that can carry you beyond Christmas. It's so good! I used the Knit Together Background Stamp for the background. This is another one of my favorites!
The Penguin Builder Punch is pretty fantastic on it's own but I love to use the set with it because of all the fun accessories for the penguins. For my card I'm keeping it simple with the hat, scarf and gifts. You could go all out with this set though! It just depends on how detailed you want to get. For my card you'll need five penguins and any accessories they want/need. I used the punch for the penguin beak too, it's the feet, I just trimmed off the toes. Their bodies are punched from the Pearlescent Paper to give them a little shimmer and sparkle. There are no dies or punches for the accessories but they're pretty easy to trim out.
Let's talk twist and pop now! This card is so amazing because when you open it there's a mechanism inside that will twist up then pop open! It's so fun! I promise your friends and family will open and close this card over and over again to watch the magic!
The inside portion has four panels. I have three more penguins inside then a panel to write a short note or sign your name. You could also do some writing on the inside of the card above or below the pop up panel too. The real magic is the panel on the inside.
Here's all the measurements you'll need to create this card. Please watch the video for details and tips. Feel free to slow down the video and pause it if you need to. I'm listing the colors I used on mine for reference.
Card Base-Blushing Bride-8 1/2" x 5 1/2"
Score the long side at 4 1/4"
Mechanism-Blushing Bride-2 1/2" x 5 1/2"
On the short side score at 1 1/4"
On the long side make marks on the top and bottom at 1 1/2" from each side. Score diagonally from the mark on the top left to the bottom right and on the bottom left to the top right.
Pop Up Panel-Blushing Bride-8" x 2 3/4"
Panel Layers-Three Coastal Cabana, One Basic White-2 1/2" x 1 3/4"
Front Layers: Coastal Cabana-5 1/4" x 4", Polished Pink-5" x 3 3/4", Basic White-5 1/4" x 2"
Check out the video for details. While you're there subscribe to my YouTube Channel so you never miss a video. I have a full supply list below. You can shop for these products in my Online Store. Check my blog tomorrow for another fun version of this card!
Check out my other Twelve Weeks Of Christmas Projects
Supplies:


No comments:
Post a Comment