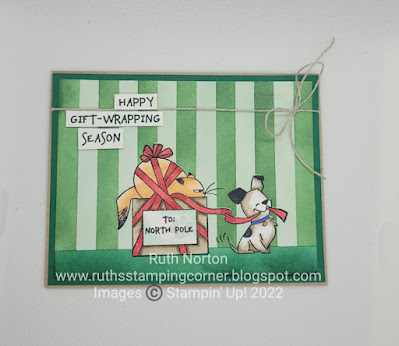
I'm so in love with this card! It's one of my favorites for sure! I'm using the North Pole Mischief Set from the Holiday Catalog. At first glance you might think "What Designer Series Paper is that?" Or maybe, "Are the cat and dog cut out or die cut". Let me tell you, that's not DSP, that's an ink blended background AND it's all ink blended OVER the stamped images. I'm going to share the magic behind the background and the stamping....it's our Masking Paper. I have a video below with all the details. Please check out the video for all the details, it's explained so much better in the video then in text.
I started by stamping the image on my Basic White Cardstock and then also again on a sheet of Masking Paper. On my cardstock I used Stampin' Blends to color my image, colors are listed below in my supply list.
There is fussy cutting involved and there's no getting around it for this card, you have to fussy cut the image out of the masking paper. Trim as close as you can to the black line or even right on the black line. Peel your trimmed image from the Masking paper and lay it over the stamped and colored image. TIP-press the masking paper onto your pants or hands a little to take a little of the 'stick' away. I like to de-stick it a little just so that it doesn't tear my cardstock. I've never had that happen but I don't want to take any chances. The mask can be reused over and over again so taking a little of 'stick' off doesn't effect the quality of it and it still provides excellent coverage.
With the image covered up, I cut three more pieces of the Masking Paper that were 1" wide. Make sure they're long enough to go across the cardstock. One strip I laid horizontally on the cardstock to make the ground or carpet in this case. The other two strips I used for the wall papered background. I grabbed my Blending Brush and some ink and worked my way across the wall papered background. Check my video for details. Once the wall was done I moved the horizontal mask to cover the wall and I ink blended a Shaded Spruce carpet. Do people have green carpet anymore??? Once all the ink blending was done remove all the masks including the one over the stamped image. Save it in your stamp case to reuse again. The magic that happens when you remove all the masks is pretty amazing! I know I'm calling this a one layer card but there are a couple of layers on here and my greeting is popped up on Dimensionals but the focal images are one layer and let's face it this is probably as close to a one layer card as I'll ever get.
Crumb Cake 8 1/2" x 5 1/2" score the long side at 4 1/4"
Shaded Spruce 5 1/4" x 4"
Basic White 5" x 3 3/4", plus scrap for greeting
Masking Paper
I have a full supply list below, you can shop for these products in my Online Store. Make sure you check out the video for all the details on this card. Subscribe to my YouTube Channel while you're there so you never miss a video.
Supplies:


No comments:
Post a Comment