Wednesday, January 31, 2024

Bright Skies No Glue Ghiradelli Box-VIDEO

I have a really fun box to share today!  This one features the fun Bright Skies Bundle.  If you love this bundle make sure to check out my Card Crate Class To Go for February.  I'm featuring this bundle for four incredible cards!  Get more details on this class here.  This bundle is so amazing, I have had so much fun creating with it!  So I had to keep going!  This box is perfectly sized for two Ghiradelli squares.  I can't take credit for the design of this box, that came from fellow demonstrator Julie Dimatteo.  The design was so fun and I absolutely love that you don't need adhesive to put this box together.  Think of all the planning ahead you can do!  This box would be great to make for craft shows, parties, showers, etc.  And you can make them in advance and store them flat!  So wonderful!!  

stampin up, bright skies bundle

I stamped some of the images from the stamp set and die cut them. I also die cut just the smallest cloud.  These little details go a long way.  I've heat embossed the greeting in white on Basic Black Cardstock to make it stand out and I finished my box with some ribbon and gems.  So fun!!!  

stampin up, bright skies

Make your own.

Basic Black 5 1/4" x 8 1/4"
On the short side score at 3/4", 1 1/2", 3 3/4" and 4 1/2"
On the long side score at 2 1/4", 3", 5 1/4" and 6"
Plus scrap for heat embossing and trimming 

Lost Lagoon
2 1/8" x 2 1/8" 
Plus scraps for die cutting

Basic White scraps for stamping and die cutting

stampin up, bright skies

Make sure you check out the video below for all the details on this project.  While you're there make sure to subscribe to my YouTube Channel so you never miss a video.  I have a full supply list below.  You can shop for these products in my Online Store.

stampin up, bright skies


Celebrate Sale-a-Bration! Shop, earn and join!


Monday, January 29, 2024

Card Crate February 2024-Bright Skies Bundle

I am happy to announce this month's exciting class to go!  Welcome to Card Crate!  The class that comes to your door and you can do your projects on your time from the comfort of your home.  

If you've done Card Crate with me in the past you'll notice three options now, there's a local one for ones that don't require shipping, that price will stay the same at $35, there's also an in person class option.  If your crate needs shipped it will be $40.

If you are local I hope you'll consider the in person class for Card Crate! I'll provide the stamps and the ink!  


Card Crate is $40 shipped
Card Crate is $35 if you're local in the Albuquerque, NM area choose a porch pick up or attend my in person class.

You'll get:

  • Supplies for your projects
  • A PDF with all the supplies and photos of projects
  • $20 in product (approximately), needed to complete your cards
  • A Thank You gift from me
  • Video Tutorial

What you'll need:
  • Stamps and ink to complete your projects, per Stampin' Up! policy all projects will come unstamped (you'll know in advance what the supplies are so you can plan ahead and place orders if you need to).  There's always room to substitute items and be creative if you don't have the exact supplies!  NOTE: Stamps and ink will be provided at my in person class
  • Adhesive, some months may contain specialty adhesive.
  • Scissors
How to purchase:
Email me and let me know you want the February Card Crate and I'll send you a link to pay via PayPal.  Per Stampin' Up! Policy I cannot list the 'buy now' button on my blog.  I can only ship to the USA.  
Please email me if you want the Card Crate stamperrdn@q.com 

Last day to RSVP for February's Card Crate is February 11.  Payment is due on February 11.  All supplies will be ordered on February 12 and classes will ship by February 23.  (Time between ordering and shipping is longer due to longer expected shipping from Stampin' Up!, I hope to have them out sooner but I'm overestimating on timelines to be safe.)  You will receive an email with your PDF when all crates have shipped.

-----------------------------------------------------

In Person Details:
You will still need to email me as listed above and let me know you want to attend this month's Card Crate Class.  Payment for the class is due by November 8.  

Class will be:
Date: Tuesday, February 27, 2024
Time: 6pm-8pm
Location: Pinspiration Albuquerque (located in the Riverside Plaza shopping center in NW Albuquerque)

I will provide all the stamps and inks needed. You will need to bring a paper trimmer, scissors and adhesives to class.  Only those paid and registered are eligible to attend the in person class. 


This month's kit is amazing!!!!  I'm featuring the Bright Skies Bundle-one of my favorites!!  You'll need the bundle to complete your projects, or attend my in person Card Crate.  You're making four incredible fun fold or movement cards.  These are some of my very favorite cards!  Add on the bundle for just $48.50, I'll pay the tax and shipping.  

Make sure you indicate that you'll need the bundle when your RSVP for Card Crate.  NOTE: You WILL need the bundle to create the cards.  

This month's Card Crate you'll make 4 amazing holiday cards using the Bright Skies Bundle. 

What you'll get in this month's kit:

  • Supplies for your 4 projects
  • Half Package of the Bright and Beautiful DSP
  • Half Page of the Holographic Trio Paper (trimmed to 6" x 12")
  • Full Package of Lighting and Stars
  • Video Tutorial
  • Free Gift

What you'll need to complete this month's kit:  

All other supplies for your cards will come in your kit.  Your kit may contain die cut, pre punched or pre dry embossed pieces.  You will need to supply all stamps and inks to complete your project.  If you don't have the supplies listed above you can place an order to get them or you can substitute what you do have.  There is always room for to be creative.  

If you have any questions please let me know.  I hope you enjoy this month's Card Crate!!

Sunday, January 28, 2024

Sale-a-Bration Sunday- Trusty Toolbox DSP Toolbox and Gift Card Holder

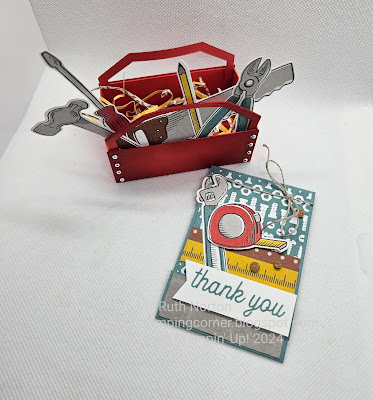
It's another Sale-a-Bration Sunday and this week we're featuring the adorable Trusty Toolbox DSP.  Earn this DSP FREE with a qualifying $50 order during Sale-a-Bration.  Today I'm making a fun mini toolbox with a matchbook style gift card holder.  Together they make a great paring for fun gift.  I'm pairing it up with the Trusty Tools Bundle in the Mini Catalog.  The dies from the bundle are amazing and will die cut some of the tools from the DSP.  The tool box is pretty cute!  I die cut it in Poppy Parade and added shading with a Blending Brush and Real Red ink.  I used Festive Pearls to make the bolts on the edges.  You can do this to the front and back or just the front.  

stampin up, trusty tools, trusty toolbox

Once the tools were die cut I adhered them to the inside front of the tool box to stand out.  I trimmed a little of the DSP into thin strips and crumbled them for some 'shreddy' in the box.  You can fill the box with lots of sweet treats.  The gift card holder features even more DSP as well as some of the new Cork Rounds.  It's a fun and quick gift card holder and it works perfectly in this box! 

stampin up, trusty tools, trusty toolbox

Make your own.

Tool Box:
Poppy Parade 6 1/2" x 7 3/4"
Score at 1" and 2 1/4" on all sides

Die cut two tool box fronts and six tool box handles

Gift Card Holder:
Lost Lagoon 2 1/2" x 8 1/4"
On the long side score at 1", 4 3/4" and 4 7/8"

Trust Toolbox DSP:
2 3/8" x 3 1/4" (Lost Lagoon screws and nuts pattern)
2 3/8" x 7/8" (Gray Granite wash pattern)
2 3/8" x 1/2" (one each of the peg board and tape measure pattern)
Lots of tools die cut or fussy cut

stampin up, trusty tools, trusty toolbox

Make sure you check out the video below for all the details on this project.  While you're there make sure to subscribe to my YouTube Channel so you never miss a video.  I have a full supply list below.  You can shop for these products in my Online Store.

stampin up, trusty tools, trusty toolbox


Celebrate Sale-a-Bration! Shop, earn and join!


Friday, January 26, 2024

Bright Skies Fun Fold With Sunny Days DSP

I am still on my fun fold kick this month.  I'm addicted LOL!  This time I'm featuring a fold that I learned in a swap.  My swap card came from fellow demonstrator Amy Rich.  It was actually a swap that I did last year sometime, but I tucked away the card knowing I wanted to recreate the fold.  It's an accordion fold and it's sooo adorable!  I'm using the Bright Skies Bundle for my card.  This bundle will be featured in my February Card Crate Class To Go.  I'll be announcing details on that on Monday!  If you love this bundle you'll want this class to go-the cards are AMAZING!!!

stampin up, bright skies bundle, sunny days dsp

For todays card I'm pairing it up with the Sunny Days DSP, you can earn this DSP free with a qualifying order during Sale-a-Bration.  It's made to coordinate with the Bright Skies Bundle so it's perfect!  To make the card base you'll accordion fold on all the score line.  On one end there's a 2 1/2" section on the other there's a 2 3/4" section.  I used the smaller section for the top and the larger section for my bottom, where my greeting is stamped.  

stampin up, bright skies bundle, sunny days dsp

I added DSP to the layers as well as lots of stamped images too.  In a fun twist I actually made 20 of these cards for a swap I did this month.  I can't wait to get my swap cards back!  This is a fun fold and perfect for so many bundles and stamp sets.  Give it a try!  

stampin up, bright skies bundle, sunny days dsp

Make your own.

Pool Party 4 1/4" x 11" on the long side score at 2 1/2", 3 3/4", 6 3/4" and 8 1/4"

Shaded Spruce 
4" x 4"
4" x 2 1/2"

DSP
3 3/4" x 3 3/4"
4" x 2 3/4" 

Basic White 3 3/4" x 2 1/4", plus scraps for stamping and die cutting

I have a full supply list below.  You can shop for these products in my Online Store.  

stampin up, bright skies bundle, sunny days dsp


Celebrate Sale-a-Bration! Shop, earn and join!


Thursday, January 25, 2024

Enduring Beauty Bundle-VIDEO

I'm so excited to share this amazing new bundle with you!  Today I'm sharing the Enduring Beauty Bundle.  In the bundle you get the stamps, dies, and decorative masks.  These three products work in harmony to make such stunning projects!  I used only two inks on my project and blending over the masks with Blending Brushes.  I encourage you to check out my video to see these products work in action.  This is a great alternative to coloring the image, and this is a big image!  I was able to do this with my masks so much quicker than with Stampin' Blends or water coloring.  But if you love to color you can also do that too! 

stampin' up, enduring beauty

I used Flirty Flamingo for my pink and Granny Apple Green for the green.  I made sure the base layers of each were light and then you can get darker with your layers.  Such stunning results.  Your friends and family will think you're an artist!  Make sure to check out my video for tips on how to line up the stencils effortlessly!  The rest of my card is pretty simple.  I added some more leaves from the dies in Granny Apple Green Cardstock.  The greeting is from the set.  I finished the card with some Brass Butterflies and Flirty Flamingo Baker's Twine.  

stampin up, enduring beauty

Make your own.

Granny Apple Green 8 1/2" x 5 1/2" score long side at 4 1/4"; scraps to die cut leaves

Lemon Lime Twist 5" x 3 3/4" embossed with the Timeworn Type Folder

Basic White pieces for stamping and die cutting

Make sure you check out the video below for all the details on this project.  While you're there make sure to subscribe to my YouTube Channel so you never miss a video.  I have a full supply list below.  You can shop for these products in my Online Store.

stampin up, enduring beauty bundle


Celebrate Sale-a-Bration! Shop, earn and join!


Monday, January 22, 2024

Kiddin' Around Book Binding Fold

One of the sweetest bundles in the Mini Catalog is the Kiddin' Around Bundle.  I love these adorable images.  It's part of the Just Kiddin' Suite which is full of amazing products!  I thought for this card I'd take their adorable imaginations and turn this card into a book binding fun fold card, I was thinking kind of like a story book.  I didn't use any of the dies for this card.  This is basically as one layer of a card as I make but you can absolutely die cut the images and pop them up.  I used a TON of Stampin' Blends to color my image, you can check out the colors in the supply list below. To give it the illusion it's popped up I went around the outside of the image with Pool Party, this gives it a faux shadow and makes it look like it's popped up.  

stampin up, kiddin around

I heat embossed in silver the stars on the book binding edge and a couple on the main focal image.  I added even more shading with a Pool Party Ink Pad and a Blending Brush.  To create the book binding fun fold, you'll add adhesive between the two score lines on the front of the card and adhere that part of the front to the back, or inside.  You can add ribbon or twine through the book binding part if desired.  I just added some silver Simply Elegant Trim around the front instead.  My greeting is on the inside popped up and punched out with the Double Oval Punch.    

stampin up, kiddin around

Make your own

Smoky Slate 4 1/4" x 11" on the long side score at 5 1/2" and 6 3/4"

Basic Gray 1" x 4", 4" x 4"

Basic White 7/8" x 3 7/8", 3 7/8" x 3 7/8" (two pieces) scraps for punching

I have a full supply list below.  You can shop for these products in my Online Store.  

stampin up, kiddin around


Celebrate Sale-a-Bration! Shop, earn and join!