Monday, August 31, 2020

Menagerie Mix Up Ghirardelli Brownies Holder-VIDEO

At my virtual meeting with my team I shared this super cute and sweet treat box.  There's so many things I love about this treat box.  One, it holds a single Ghirardelli brownie mix!  Hello---YUM!!!  Two, it's the size of a card front, so basically you're simply decorating this to be a card.....with a little added surprise inside.  I used the Menagerie Mix-Up Bundle for this, seriously could that reindeer be any cuter!!!!  The DSP is all from the Trimming The Town DSP pack.  This one is super cute!!!!
I love how this is designed to hold a brownie mix.  But you could resize it for a packet of hot cocoa, or leave it larger and add a couple packets of hot cocoa, or hot cocoa and a little cello bag of stacked mini marshmallows.  I would love that!!! But the brownie is good too.  These are the small single serving mug mix. I found a box of four at Target.  But I've seen them everywhere.

To make it you'll need a piece of cardstock that is 10" x 8 1/2".  On the long side score at 4 1/4", 4 3/4" 9" and 9 1/2".  On the short side score at 5 1/2" and 6".  Check out the video for details on this cute treat!

Shop my Online Store.
Thanks for looking, see you soon!!!


Supplies:
Menagerie Mix Up Bundle
Poppy Parade Cardstock
Crumb Cake Cardstock
Soft Suede Cardstock
Whisper White Cardstock
Trimming the Town DSP
Soft Suede Ink
Black Memento Ink
Crumb Cake Stampin' Blends
Soft Suede Stampin' Blends
Old Olive Stampin' Blends
Poppy Parade Stampin' Blends
Daffodil Delight Stampin' Blends
Petal Pink Stampin' Blends
Color Lifter
All The Trimmings Ribbon
All The Trimmings Embellishments
Wink of Stella

Friday, August 28, 2020

Returning Favorite Spotlight-Christmas Countdown Kit


Did you notice in the new August-December 2020 Mini Catalog that we have some amazing returning favorites in this catalog?  Maybe you missed them the first time around or maybe you need to purchase another one.  Now is your chance!!!!  This was and still is one of my all time favorite products from last years Holiday Catalog.  Don't miss the Christmas Countdown Kit!!!  Also don't let the name fool you, this kit is for anything, I mean ANYTHING!!!  I made this Disney countdown last year, we used it to countdown to our trip to Walt Disney World last November.   I love it!!!
To read all about my Disney Countdown Calendar check out the original post here.


In addition to the Disney one, I made the Christmas one as designed in the kit.  These are the backside of the Disney boxes.  When we returned from our trip I simply flipped the boxes around and boom ready for Christmas!  You could use these boxes for jewelry, accessories or embellishments, and so much more.  There's endless ideas.  So don't miss getting your Christmas Countdown kit today!
Details on the Christmas version can be found here.

Shop for the Christmas Countdown Kit here.

Shop my Online Store.
Thanks for looking, see you soon!!!

Wednesday, August 26, 2020

Halloween Spider Box

Can you believe it's already time to craft for Halloween!  This has been the longest year of my life but it's also going to quickly.  Weird.  I don't generally do too much crafting for Halloween, but every year I come up with a cute and quick Halloween treat, this one is pretty cute!  One of my favorite bundles from the new Holiday Mini Catalog is the Little Treats Bundle.  In the dies there's this spider and he's perfect for Halloween!
I die cut the spider 3 times and stacked them all together.  Before you die cut make sure you add some Adhesive Sheets to your cardstock, that will make adhering him soooo much easier.  Especially all those legs!  Once all those die cuts are stacked together it's super sturdy like a piece of chipboard.  I layered him onto a circle cut from the Tasteful Labels Dies, then the Layering Circles Dies and finally the scallop circle from the Little Treats Box Dies.
The box is simple to assemble, you'll need a piece that is 5 1/2" x 5 1/2".  On one side score at 1" and 4 1/2", on the other side score at 1 1/2", 2 1/2", 4" and 5".  The box is sized perfectly for two snack sized candy bars.  These were found in our grocery store.  They're a little bigger than the tiny fun sized ones but way smaller then a full sized one.  You could fill this box with lots of different candy treats though!  I have a full shopping list below.

Shop my Online Store.
Thanks for looking, see you soon!!!


Monday, August 24, 2020

Guest Blogger: Kim Madrid

I asked my bestie Kim Madrid to step in and blog today.  She's an excellent stamper brightens my mailbox frequently!  Enjoy her work! 

As soon as I saw the camouflage background stamp in the 2020-2021 Annual Catalog, I knew I had to get it!  I remember a zebra background stamp we had a few years back and people would stamp it in "unexpected" colors and make the cutest things.  I knew right away I wanted to try stamping it in "pink" - in this case, I opted for one of our new in-colors, "Magenta Madness".  The camouflage stamp is a "Distinktive" stamp, which means it creates different opacities in a single stamped image so that you end up with an image that has depth and intensity.

Another "must have" stamp from the Annual Catalog for me was the "Ridiculously Awesome" stamp set.  This set was inspired by one of our Million Dollar Sales achievers and was hand-drawn by Sean Douglas (the husband of Stampin' Up! CEO Sara Douglas).  I love this set because it has a variety of bold sentiments and there's something for just about ANY type of card you want to send.  I chose the sentiment "You Got This" and it turned this card in to a real "girl power" card!  I love it!  This card would be great for someone preparing for an important college exam, going for a big job interview, battling cancer, embarking on a new journey or lots of other scenarios.

I cut the sentiment and background piece out using the "Tasteful Label" dies and then punched three flowers using the "Small Bloom" punch.  I "smooshed" the flowers up a bit to make them look a little more 3D and then added a rhinestone to the middle.  I added a thin piece of "Rainbow Glimmer Paper" behind the camouflage strip.  (Just trim the glimmer paper to get the color you need for your card.)   Finally, I finished the card off with some Magenta Madness ribbon and enamel dots.

I hope you enjoyed this card.  Thanks, Ruth, for letting me guest blog for you!


Thanks for looking, see you soon!!!

Friday, August 21, 2020

Team Spotlight! Juanita

I'm so excited to share this special series with you.  Over the next month or two I'll be showcasing some of my team members.  I asked everyone to send me some of their work to share on my blog.  Those that did will have a featured post coming up this month and possible into September too! I have an amazing team, I hope you enjoy this fun series!
Juanita is one of my newer team members and I'm just loving her work!  I'm a sucker for Black and literally ANY color.  This card is just beautiful with Black, Magenta Madness and oh yeah that's gold too!
I love the simplicity of this card, the clean and simple lines just make me happy!
I love all of her uses of embossing folders, she really uses them well!  I often forget to use mine, so when I see a card where it's featured so well it makes me want to get mine out!
Who doesn't love a cut purse and matching card?  So cute!
I love this feather.  I love the repeated stamping on this card.  Great color choices too!
Here clean and simple layouts inspired me!  I love this layout!
Finally a beautiful shaker!  So many wonderful things about all of her work!

Shop my Online Store.
Thanks for looking, see you soon!!!!

Wednesday, August 19, 2020

Team Make and Takes

I'm still sharing some amazing projects from our virtual team meeting earlier this month.  Even though we couldn't gather in person we still had so much fun laughing and chatting!  For my virtual meetings if you RSVP to attend I send a make and take kit to you so that you can make the cards with me.  So everyone who RSVP'd early got a kit to make these two amazing cards!  I love them both.  For the first one we used the Snowflake Splendor DSP and it's just stunning!  I paired it with the Peace and Joy Bundle which is one of my favorite bundles!  I love the scripty words and the block greetings together! I did all the die cutting in advance the smallest 'joy' die cut was cut from our velveteen paper which just makes is super fun.  The texture is amazing! 
Speaking of texture, look at that amazing pumpkin!  We got all that texture on the pumpkin simply by crumpling the cardstock and really adding lots of crinkles and wrinkles to it.  For this card I paired new items with returning favorites and even items from the Annual catalog.  I love it!!  First the Plaid Tidings DSP!  LOVE!!!!!  The greeting is from the Celebration Tidings Set. The leaves are from one of my favorites that's returned, the Gathered Leaves Dies!  LOVE this bundle!  Finally I brought in the Apple Builder Punch from the annual catalog for our pumpkin.  So cute!!!  I have a full shopping list below. 

Shop my Online Store.
Thanks for looking, see you soon!!!!

Supplies:
Peace and Joy Bundle
Celebration Tidings Bundle
Highland Heather Cardstock
Mango Melody Cardstock
Early Espresso Cardstock
Old Olive Cardstock
Whisper White Cardstock
Very Vanilla Cardstock
Snowflake Splendor DSP
Plaid Tidings DSP
Vellum Cardstock
Velveteen Paper
Highland Heather Ink
Early Espresso Ink
Snowflake Embellishments
All The Trimmings Ribbon Pack
Apple Builder Punch
Dainty Diamonds Folder
Pinewood Planks Folder

Monday, August 17, 2020

Team Spotlight! Dana

I'm so excited to share this special series with you.  Over the next month or two I'll be showcasing some of my team members.  I asked everyone to send me some of their work to share on my blog.  Those that did will have a featured post coming up this month and possible into September too! I have an amazing team, I hope you enjoy this fun series!
Today is Dana.  Now Dana is a work horse.  She makes the most elaborate and detailed projects.  It is always so exciting to see what she's making.  For instance, this chocolate wallet or box.  You guys it holds TWO full sized chocolates!  How can you not love it! 
This card uses some Paper Pumpkin mixed with DSP and more!  I love how she pulls things together from so many areas. I need to work on using my Paper Pumpkin supplies in other ways.  Dana is great at this!
This is stunning!  You can't go wrong with black and white! So pretty!
Can we just talk about how cute these popsicle boxes are??  Wouldn't they be so cute with a gift card to an ice cream shop in them?!!
These last two projects are true Dana style.  There's multiple folds layers and more!  And if I know Dana, they probably fold to fit in an envelope! (Don't take my word on that, I'd have to check with Dana).

Shop my Online Store.
Thanks for looking, see you soon!!!

Friday, August 14, 2020

Envelope Dies Gift Card Holder-VIDEO

Another fun gift idea I shared with my team was this super cute gift card holder featuring lots of new products from the new Mini Catalog.  First let's talk about the new Envelope Dies in the new catalog.  They are awesome!!!!  They have scallop borders and fit on our Stampin' Up! envelopes perfectly!  If you're looking to dress up some envelopes these are the dies.  But I wanted to try them in a different way by making a simple gift card holder.
For this holder you're essentially making your own mini envelope but sized to hold a gift card and it's stinkin' cute!  To make it you'll need a piece of cardstock that is 4 3/4" x 6 3/4".  On the long side score at 2 1/4" and 4 1/2" .  Simply take one of the envelope dies and trim off a scallop border on each end.  Fold one side up to be the gift card pocket and staple closed.  You can also just add glue to the sides if you don't want to use a staple.  Make sure to add any DSP or stamping to the inside before you adhere or staple it closed.  This makes your pocket and securely holds your gift card.  Embellish the outside as you want.  I used a belly band to hold the holder closed.  My ornament is die cut with the dies from the Envelope Dies and it's stamped using the Tree Angle Stamp Set.  Super cute and easy!  I have a full shopping list below.

Shop my Online Store.
Thanks for looking, see you soon!!!


Supplies:
Tree Angle Stamp Set
Old Olive Cardstock
Night Of Navy Cardstock
Whisper White Cardstock
Trimming The Town DSP
Night of Navy Ink
Night of Navy Stampin' Blends
All The Trimmings Embellishments
Playing With Patterns Ribbon
Envelope Dies

Wednesday, August 12, 2020

Team Spotlight! Cindy

I'm so excited to share this special series with you.  Over the next month or two I'll be showcasing some of my team members.  I asked everyone to send me some of their work to share on my blog.  Those that did will have a featured post coming up this month and possible into September too! I have an amazing team, I hope you enjoy this fun series!
Today is Cindy. Now Cindy is not only my team member but she's also my mom/class assistant/whatever else I need done or borrowed.  She was my very first customer too.  Moms are great like that right.  She's been stamping up a storm in her time at home and has been mailing cards like crazy too!  Don't forget that's an important step of card making.  She used the new Celebrate Sunflowers bundle to make a bunch of cards.  Aren't they beautiful?  I love the pink sunflower one the most!

Shop my Online Store.
Thanks for looking, see you soon!!!!

Monday, August 10, 2020

While I'm Away Ordering Special

Hi Friends!!!
Well I have some news.  I'm having surgery today and will be out of commission for the rest of the month.  I'm hoping to return to business in September but I won't be rushing my healing progress so we'll be playing it by ear.  Don't worry though, I've worked really hard and I have tons to share while I'm out.  I'm spotlighting some of my amazing team, I have a guest blogger coming in and I have lots of projects to share featuring some of the new August-December Mini Catalog Products Yay!!!!  While I'm out though I won't be able to offer classes to go or in person.  I'm asking for your help to help out my small business with your order in my Online Store.  Every time you place an order through me, no matter the size of the order, you help me and my small business succeed!  As a THANK YOU for ordering this month while I'm out I have some amazing rewards for you!!

To earn these free gifts you must place your order in my online store.  
Orders under $150* must use the host code below.  Orders without the host code will NOT receive the gifts.  Exception if you order is over $150* don't use the host code.  Orders over $150* will receive the gifts free.  
All gifts will ship in September.  I'll email you when they're on their way.  
*dollar amount before tax and shipping

HOST CODE FOR FREE GIFTS  
AWWVDQTQ

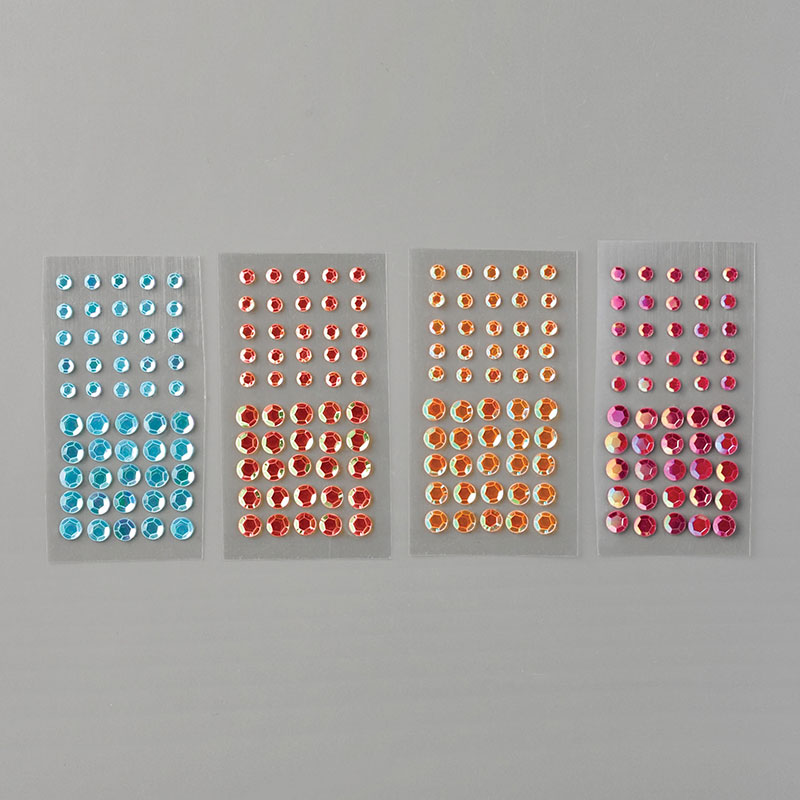
When your order in my Online Store is $50* you'll receive the Artistry Blooms Sequins FREE!!!  These have been my go to accessory.  I love them!!!  I know you will too!!! 


When your order in my Online Store is $100* you'll receive the Artistry Blooms Sequins PLUS the Elegant Faceted Gems FREE!!!  A very close second these are my 2nd most love accessory right now!! 


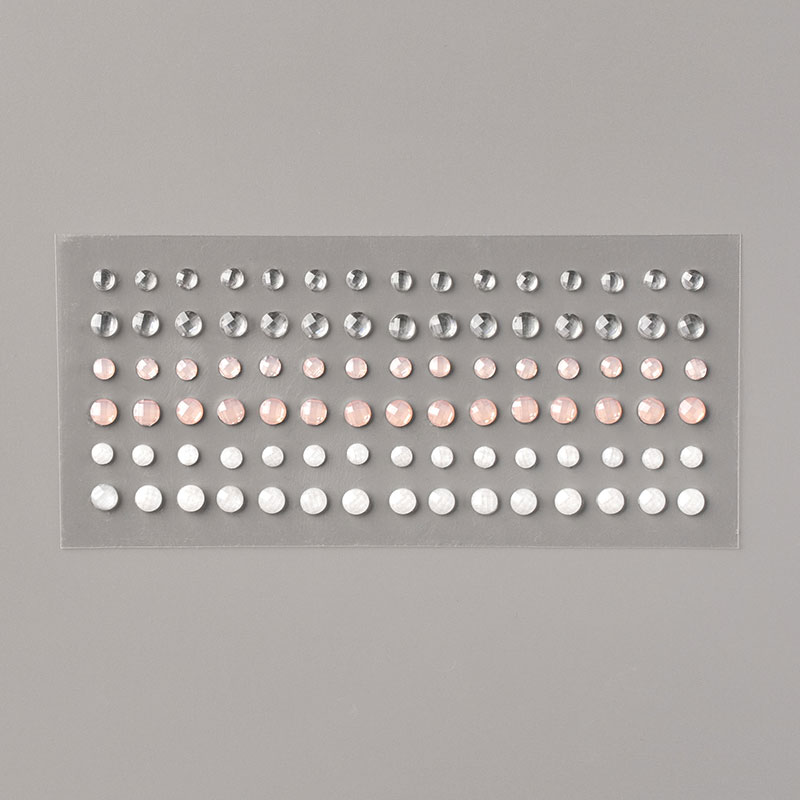
When your order in my Online Store is $150* you'll receive the Artistry Blooms Sequins PLUS the Elegant Faceted Gems PLUS the Dainty Diamonds Folder FREE!!!  In addition to my free gifts you'll also get Stampin' Rewards with your $150+ order!  That's free dollars you can spend on anything in the catalog-including those exclusive hostess sets!  


BUT WAIT THAT'S NOT ALL!!!  EVERY ORDER PLACED WILL BE ENTERED TO WIN A MINI STAMPIN' UP! TRIMMER!!!  These trimmers were only available to new recruits during Sale-a-Bration.  But now YOU can win one FREE!!! Earn an entry for every $50* you spend! Winner will be notified in September.  

To earn these free gifts you must place your order in my online store.  
Orders under $150* must use the host code below.  Orders without the host code will NOT receive the gifts.  Exception if you order is over $150* don't use the host code.  Orders over $150* will receive the gifts free.  
All gifts will ship in September.  I'll email you when they're on their way.  
*dollar amount before tax and shipping

HOST CODE FOR FREE GIFTS  
AWWVDQTQ

Friday, August 7, 2020

Velveteen Paper Cat With Menagerie Mix Up Bundle-VIDEO

I have the cutest card to share with you today!!!  Plus it features a product you probably haven't played with too much.  I'm using the Color Velveteen Paper to create my cute cat.  I've struggled with how to use this paper.  It's soft and velvety but it's in unique colors.  When I saw the Menagerie Mix Up Bundle in the August-December Mini Catalog I instantly thought of the velveteen paper.  But could you stamp on it? YES!!!  But you do need to allow some drying time.  The ink doesn't dry instantly to the velveteen so make sure to leave plenty of drying time.  


Once they were nice and dry I die cut everything and assembled it as usual.  It's so cute!  I pulled in my must have stamp set Peace and Joy for the background and greeting of the card.  I love the holly's.  To finish the card I used some dies from the Forever Flourishing Dies and some Linen Thread.  Check out the video for all the details on this card.  I have a full shopping list below.

Shop my Online Store.
Thanks for looking, see you soon!!!


Supplies:
Menagerie Mix Up Bundle
Peace and Joy Set
Pear Pizzazz Cardstock
Cinnamon Cider Cardstock
Highland Heather Cardstock
Whisper White Cardstock
Color Velveteen Paper
Gold Foil
Gorgeous Grape Ink
Soft Suede Ink
Pear Pizzazz Ink
Linen Thread
Gold Glimmer Dots
Forever Flourishing Dies
Stitched Shapes Dies

Wednesday, August 5, 2020

Team Spotlight! Gina

I'm so excited to share this special series with you.  Over the next month or two I'll be showcasing some of my team members.  I asked everyone to send me some of their work to share on my blog.  Those that did will have a featured post coming up this month and possible into September too! I have an amazing team, I hope you enjoy this fun series!
Today is Gina!  Gina does amazing work and is very detail oriented.  I love her thoughtful choice of colors and how they work beautifully together! This card is simply beautiful!  Plus it's a fun fold, you know I love a fun fold!
But not only is it a fun fold but a gift card holder too!  Amazing card!  Thank you Gina for sharing your work!

Shop my Online Store.
Thanks for looking, see you soon!!!

Tuesday, August 4, 2020

New August-December Mini Catalog Launch!

Today is the day!!  Our August-December 2020 Mini Catalog Launch!!!  You might recognize this catalog as the Holiday Catalog!  If you love to create for the holiday's this catalog is full of amazing products!!!  

If you don't have a demonstrator and you live in the USA I'd be happy to send you a catalog.  Send me an email at stamperrdn@q.com to request one.  

You can begin shopping from the new catalog today!!!  Shop in my Online Store!  
You might notice a facelift in my Online Store.  The Stampin' Up! Online Store is updated with amazing features easier search functions, pop ups that let you know when you've earned Stampin' Rewards or 50% off items, easier shopping experience, sharable wish lists and more!!!  I'm so excited for this new change and I hope you are too.  Because this is a new site if you have your password saved to auto fill it won't recognize you the first time.  If you don't know your password you can easily reset it. If you encounter any problems feel free to reach out to me. 

When you're shopping in the new store, make sure you're shopping with me.  
My name should be at the top.  
Use this host code when you're shopping for even more benefits.  Make sure you check my blog on August 10 for HUGE ordering specials!!!   

Monday, August 3, 2020

Rainbow Zebra

I have another quick and fun card for you today.  This one is another card that you could easily mass produce and it's soooo cute!!!  I broke out my Rainbow Glimmer Paper again for this card (surprised?).  I also pulled out the Zany Zebras Set.  I can't believe how much I love this set.  Now if you think that the zebras are just for kids or baby cards you're wrong.  I've made soooooo many project with this set and every single one of them could be used for an adult.  This one included!  I cut stripes of the glimmer paper at 1/2" each and then adhered them on the card in a diagonal pattern.  I then stamped and punched out my zebra, added a greeting and boom done!  Call it a day!  I have a full supply list below. 

Shop my Online Store.
Thanks for looking, see you soon!!!!

Supplies:
Zany Zebras Set
Massive Thanks Set
Just Jade Cardstock 
Whisper White Cardstock
Rainbow Glimmer Paper
Black Memento Ink
2 1/4" Circle Punch
Frosted Epoxy Droplets

Redeem your Bonus Days Coupons Today!