Thursday, September 29, 2022

October 2022 Card Crate-Sweet Candy Canes Bundle

I am happy to announce a new way to do classes with me!  Welcome to Card Crate!  The class that comes to your door and you can do your projects on your time from the comfort of your home.


Card Crate is $35 (includes shipping!)

You'll get:

  • Supplies for your projects
  • A PDF with all the supplies and photos of projects
  • $20 in product, needed to complete your cards
  • A Thank You gift from me
  • Video Tutorial

What you'll need:
  • Stamps and ink to complete your projects, per Stampin' Up! policy all projects will come unstamped (you'll know in advance what the supplies are so you can plan ahead and place orders if you need to).  There's always room to substitute items and be creative if you don't have the exact supplies!
  • Adhesive, some months may contain specialty adhesive.
  • Scissors
How to purchase:
Email me and let me know you want the October Card Crate and I'll send you a link to pay via PayPal.  Per Stampin' Up! Policy I cannot list the 'buy now' button on my blog.
Please email me if you want the Card Crate stamperrdn@q.com

Last day to RSVP for October's Card Crate is October 9.  Payment is due on October 9.  All supplies will be ordered on October 10 and classes will ship by October 25.  (Time between ordering and shipping is longer due to longer expected shipping from Stampin' Up!, I hope to have them out sooner but I'm overestimating on timelines to be safe.)  You will receive an email with your PDF when all crates have shipped.


This month's kit is festive and fun! I'm featuring the Sweet Candy Canes Bundle and it's a Stamp-a-Stack.  You'll make 8 cards (2 each of 4 designs).  If you love classic Christmas colors and sparkle this class is for you!  You will need the stamps and dies to complete the cards.  Add on the bundle for $51.25, I'll pay the tax and shipping.  

Make sure you indicate that you'll need the bundle when your RSVP for Card Crate.  NOTE: You WILL need the stamps and dies to create the cards. 


This month's Card Crate you'll make 8 adorable cards, 2 each of 4 designs with the Sweet Candy Canes Bundle! 

What you'll get in this month's kit:

  • Supplies for your 8 projects 
  • Full package of Red and White Glimmer Paper
  • Full package of Red Rhinestones
  • Full roll of Red Ruffled Ribbon
  • PDF Instructions with photos and measurements
  • Video Tutorial
  • Free Gift

What you'll need to complete this month's kit: 

All other supplies for your cards will come in your kit.  Your kit may contain die cut, pre punched or pre dry embossed pieces.  You will need to supply all stamps and inks to complete your project.  If you don't have the supplies listed above you can place an order to get them or you can substitute what you do have.  There is always room for to be creative.  

If you have any questions please let me know.  I hope you enjoy this month's Card Crate!!


Wednesday, September 28, 2022

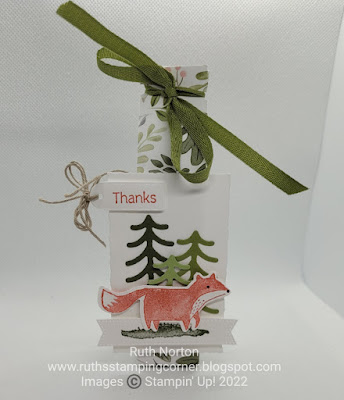
Happier Than Happy Box-VIDEO

I'm excited to share today's box with you!  I think I say this every week but this is a great box you can use year round.  Change up the DSP and stamps and you have a fantastic gift all year long.  Today I'm using the Happier Than Happy Bundle.  This one is in the Annual Catalog and I know that some of you may have glanced right over it and dismissed it because it's a 'baby set', it's more than that I'm going to show you how to use it for adults too.  

stampin up, happier than happy, happy forest friends

This is a taller, skinnier box and it's held closed with some ribbon on the top.  You could also use clips or clothespins to keep it closed.  My box is made with the Happy Forest Friends DSP.  The ribbon I'm using is the Old Olive Twill Ribbon from the Old Olive/Sahara Sand Combo Pack.  

stampin up, happier than happy, happy forest friends

The tag on the front it die cut with the Deckled Rectangles Dies.  I stamped my fox in Calypso Coral ink and highlighted the eye and nose with a Basic Black Stampin' Write Marker.  I die cut three trees with the coordinating dies from the bundle in Mossy Meadow, Old Olive and Pear Pizzazz.  The tag is also from those dies, I ran the tag through twice to shorten it.  Check my video for details on this fun tip!  

stampin up, happier than happy, happy forest friends

Inside my box is a cute pumpkin cupcake scented hand cream from Bath and Body Works.  They sell these small lotions year round in different scents.  You can gift this box year round!  I love giving out lotions in the fall and winter when everyone's hands need a little extra help.  

DSP 5 1/2" x 7"
On the long side score at 1 1/4" 
On the short side score at 1 1/4", 2 1/2", 3 3/4" and 5"

I have a full supply list below.  You can shop for these products in my Online Store.  Make sure you check out the video for all the details on this box.  Subscribe to my YouTube Channel so you never miss a video.  

stampin up, happier than happy, happy forest friends

Shop my Online Store.  
Thanks for looking, see you soon!!!

Supplies: 
Other:Hole Punch


Shop the Weekly Deals here.

Shop the Perfect Partners Promotion here.


Tuesday, September 27, 2022

Being Part Of My Life

I'm sharing another adorable card today with the By My Side Set.  If you missed yesterday's post make sure you check that out for another cute card.  Today I'm sharing a cute card that you don't have to fussy cut.  I think I hear some of you celebrating.  I love to fussy cut but I also know that not everyone does and that some images are trickier than others to fussy cut.  I wanted to give you a fun idea for a card that required zero fussy cutting.  This one is so adorable!  I used some DSP for the background and I added some interest to the images with another layer of Night of Navy Cardstock that is die cut with the Fabulous Frames Dies.  

stampin up, by my side

Like my other card, I used Stampin' Blends to color my images.  These are my favorite and go to for coloring.  I have all the colors used listed below.  I finished my card with some Crumb Cake Baker's Twine and Glossy Dots.  I have a full supply list.  You can shop for these products in my Online Store.  

stampin up, by my side


Monday, September 26, 2022

You Did It

I have an adorable card to share with you today.  I'm featuring the By My Side Set on my blog today and tomorrow.  If you want another fun idea with it, check back to this post I shared earlier this month.  This set is so adorable and I just love the sweet images.  I love keeping my card simple when I've already spent lots of time coloring images.  I used some DSP and glimmer paper strips that are each 5 1/4" x 1 1/4".  I think the simple patterns and sparkle is all the background needs on this card.  

stampin up, by my side

For my sweet little girl I colored her with Stampn' Blends, colors listed below.  There's no dies so you do have to fussy cut her, if you're not a fan of fussy cutting simply use a larger shape and stamp her directly onto it.  My oval and tag die cuts are from the Fabulous Frames Dies.  I love these and don't use them nearly enough!  I finished the card with some Baker's Twine and Fine Sparkle Gems.  Check back tomorrow for another cute card with this set that requires NO fussy cutting! I have a full supply list below.  You can shop for these products in my Online Store.  

stampin up, by my side


Friday, September 23, 2022

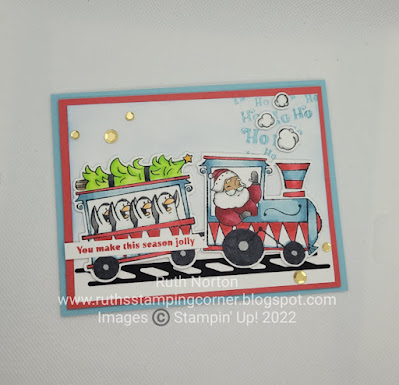
Jolly Santa Express

I had so much fun making this card.  I haven't had a chance to play with the Santa's Delivery Bundle much so when I finally did bring it out I had so much fun!  This is a coloring heavy bundle.  If you love to color this one is for you.  There's so many amazing ways that you can color this.  I used Stampin' Blends for mine, all colors are listed below in the supply list.  I die cut my images with the coordinating dies in the set.  They're all added to a simple card base.  When your images are this detailed you don't need to add much to the card base.  

stampin up, santa's delivery

One of my favorite parts of this bundle are all the little accent pieces.  I love the penguins and tree so much!  They're so cute!!!  I used some Masking Paper to get all my penguins in the train car without overlapping them.  I started with the front penguin, then covered it with the Masking Paper and stamped the second penguin.  I repeated the process until my train car was full. If you want to learn more about our Masking Paper check out this post.  I finished the card with some sequins.  I have a full supply list below.  You can shop for these products in my Online Store.   

stampin up, santa's delivery


Wednesday, September 21, 2022

Hello Harvest Double Angled Lid Cupcake Box-VIDEO

I love today's box.  It's so much fun!  You can easily adapt this for any occasion as well.  Change up the DSP and the images and you have a completely different box.  Inside my box is a Hostess Pumpkin Cupcake.  They sell versions of cupcakes year round so you can easily adapt this as a year round box.  

stampin up, rustic pumpkin

I'm using the Hello Harvest Bundle.  This is my favorite bundle for fall themed projects  I love this fun pumpkin.  This bundle, however, is currently unavailable right now.  It will be back in stock in a few weeks, but you may already have it or have another fall set you can use instead.  Along with the bundle the DSP is also on the unorderable list, but it should be back in stock the week of October 3rd.  Not such a long wait with the DSP.  I usually try not to share items that are not available for purchase but sometimes it happens.  Just know they will be back in stock and to keep checking my Online Store.  

stampin up, hello harvest

This box is fun because it has a double angled lid.  The lid pieces are made exactly the same way with the same measurements but adding them to both sides of the box and using different patterns makes it really fun!  

stampin up, hello harvest

I used watercolor pencils to color my pumpkin.  I used pencils from both packages.  I love how they work together.  When you're watercoloring you need to make sure to use a permant ink.  I stamped my pumpkin StazOn Ink.  You also need to use paper that can handle extra moisture, our Basic White Cardstock cannot handle the water.  I used Shimmery White Cardstock, our Watercolor Paper is also a good choice.  My greeting, heart and tag are from the Warm Welcome Bundle.  Stampin' Up! is featuring this bundle in their virtual World Card Making Day event.  Learn more about that event in September News Post here.  

stampin up, hello harvest

Make sure you check out the video for all the details on this box.  I'm sharing a picture of one of the lid pieces trimmed so you can refer back to that.  You'll trim both DSP pieces for the lid the same way.  

Pumpkin Pie 6 1/2" x 6 1/2" score at 1 3/4" on all sides
2 7/8" x 2 /78" for bottom of the box

DSP pieces (two) 6 1/2" x 5 3/8"
On the long side score at 1 3/4" each side
On the short side score at 5/8" and 2 3/8"

Cajun Craze 2 7/8" x 2 7/8"
Basic White 2 3/4" x 2 3/4"

Make sure you subscribe to my YouTube Channel so you never miss a video.  I have a full supply list below.  You can shop for these products in my Online Store.  


Shop my Online Store.  
Thanks for looking, see you soon!!!

Supplies:


Shop the Weekly Deals here.

Shop the Perfect Partners Promotion here.


Tuesday, September 20, 2022

Hues Of Happiness Hello

One of my favorite Designer Series Papers in the Annual Catalog has to be the Hues Of Happiness DSP.  Not only do the bright fun colors call to me but the patterns have images that coordinate with the Blossoming Happiness Dies and can be cut directly from the DSP.  I had a stack of these flowers sitting on my desk for weeks, already cut and ready to go.  While doing a deep clean of my desk last week I found this stack of flowers and made a stack of cards in no time!  The cards are gorgeous and came together so quickly with the flowers ready to go! 

stampin up, hues of happiness

For my cards I used a Fresh Freesia card base and trimmed up some coordinating DSP from the same package to 4" x 5 1/4".  I added a layer of vellum, trimmed to 5 3/4" x 3 1/2", to help the flowers pop off the DSP more.  Finally I wanted a greeting I could use for a variety of occasions so I used a greeting from the new Warm Welcome Bundle.  This bundle will be in the next January-June Mini Catalog but we have a chance to order it this month as part of Stampin' Up! World Card Making Day Event.  You can join in on the event too!  Learn more about this free virtual event in my September News post here.  The card is finished with some Glossy Dots.  I have a full supply list below, you can shop for these products in my Online Store.  

stampin up, hues of happiness dsp


Friday, September 16, 2022

Christmas Scottie Note Of Thanks

Today's card is so adorable!  It's a great card to make to use up lots of scraps!  I'm using the Christmas Scottie Set, there is a coordinating punch for this set.  I'm not using the punch today but if you love this set I highly suggest you getting the bundle with the punch, you'll save 10% on the bundle plus the punch is so cute!  For my pups today I stamped and fussy cut them.  I stamped them in Early Espresso Ink but I used my Stamparatus to stamp them a couple of times to get a nice solid image.  After it was stamped I fussy cut the dog and bow.  You can easily cut out the fussy cutting and stamp it on a bigger circle or other shape.  I love the extra dimension and I love fussy cutting! 

stampin up, christmas scottie

I used scraps for my background they're all 1 1/4" wide, their height varies, some are 3 1/2" and some are 3 3/4".  Each of them has something different going one.  Three are stamped with different stamps.  The 'woof' and plaid is from the Christmas Scottie Set, the leaves on the Early Espresso are from the Cottage Wreaths Set.  I loved those leaves.  The Crumb Cake one is embossed with the Timber Embossing Folder.  To finish the card I added some Heart Pearls that I colored with Daffodil Delight Stampin' Blends.  I also added a Linen Thread bow.  I have a full supply list below.  You can shop for these products in my Online Store.  

stampin up, christmas scottie


Wednesday, September 14, 2022

By My Side Fry Box-VIDEO

Today's treat box is soooo adorable.  I'm using the super cute By My Side Set.  This is such a cute set!  I'm so in love with these adorable images and the super cute greetings!  I stamped my girl in Memento and colored her with Stampin' Blends, colors listed in the supply list below.  There's no dies so you have to fussy cut her out.  If your not a fan of fussy cutting, stamp her on a circle and add her to the box.  The greeting is stamped on a label from the Cracker Treat Box Dies.  It's the perfect size!   

stampin up, by my side

As cute as the little girl is this box is so stinkin' cute too!  I made a fun mini fry box!  The bottom curves up just like a fry box and also like a fry box the front and back slight curve too.  I just love it and it's so much easier to make than you thought!  You'll need some circle dies.  I'm using the Layering Circle Dies, the third largest circle.  We'll get to details on the box in a minute.  Make sure you check out my video though, it's easier to watch then to type instructions.  


Inside my fry box is a fun little elephant soap.  I got these from Etsy, I've had them for a while and had planned to use the Elephant Parade Bundle (which by the way could be easily substituted) but I was so excited to use the By My Side Set.  I think it's adorable.  The little elephant soaps aren't currently in her Etsy Store, but I'm linking the store here because I've noticed they go in and out of stock.  You can always message the store and ask for them.  They fit perfectly in this box.  But lots of other things would too, a few Hershey Kisses, nuggest or other treat!

stampin up, by my side

Here's measurements for the box.  Please check out the video for details on this fun fry box!  

Soft Sea Foam 5" x 3 1/4"
Score short side first at 1/2" on both sides
On the long side score at 2" only to the first horizontal score line, score at 2 1/2" only to the first horizontal score line.  Turn cardstock to the back side and mark at the 2" and 2 1/2" marks only to the horizontal score line.  Your score marks should line up with each other but there should be NO score lines across the center of the cardstock.  

Using the 3rd largest circle die from the Layering Circles Dies, line up the circle in the center of the score lines and score half circles from the 2" mark on one side to the 2" mark on the other side.  Slide the die over and repeat with 2 1/2" marks.  

To make the larger one shown in the video use these measurements with the same circle die:
5 1/2" x 4 1/4"
Score the short side at 1" each side
On the long side mark at 2" and 3", follow all other directions listed above.  

stampin up, by my side

I have a full supply list below.  You can shop for these products in my Online Store.  Check out the video for details and make sure you subscribe to my YouTube Channel so you never miss a video.  

stampin up, by my side