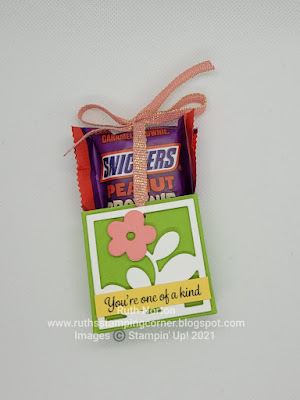
I have a super simple box to share with you today. One of my favorite types of boxes are slider boxes. I first made this type of box with a hot cocoa packet and I've been hooked on them ever since. I love that you simply pull the ribbon and out slides your treat!
It's so simple but so cute all together!! My box is Granny Apple Green Cardstock and I used the Floral Squares Dies to fancy it up a little. I love these dies, they're so elegant and gorgeous and need no other embellishments! My greeting is from the Prince and Princess Host Set. This is a set that you can only earn with your Stampin' Reward Dollars. When you place an order over $150 you'll begin earning Stampin' Rewards. Gather up some friends orders if you don't want to place such a large order, combine them all and earn the Stampin' Rewards. Then you can choose this set free!!
Inside my box were some mini Snickers Peanut Brownies. I found them at my local Walmart in the Halloween section. I didn't even get to try one before I gave them all away so I may need to get another bag LOL. Can't find those. I think maybe a couple Ghirardelli chocolate squares may fit. The finished box is 2" x 2" x 3/4". My ribbon is the Flirty Flamingo Metallic Ribbon. I love this ribbon, it has little specks of gold in it and really just shimmer and shines!
I have some step by step instructions for my box.
You'll need a piece of cardstock that is 3 1/2" x 4 3/4"
On the short side score at 3/4" on each side
On the long side score at 2" and 2 3/4"
Fold and burnish your score lines. Trim the center square tabs as shown in the photo.
Fold your center tabs inside and add some strong adhesive to the backs of them, I'm using Tear and Tape. You'll also add some adhesive to the tabs on one of your sides of the box. Both sides are identical, at this point it doesn't matter which is the front and which is the back. Choose a side and add adhesive to both tabs.
Adhere your tabs to the inside of the front. Fold and adhere the side tabs over the front tabs. Your box is assembled! Easy!
To make the slider. Punch a hole (I used a hand held hole punch you can get in any office store), in the front and back. Thread your ribbon through and use your treat to push the ribbon into the box. Tie your bow on top of the box above your treat. I have a full supply list below. You can shop for these products in my Online Store.
Shop my Online Store.
Thanks for looking, see you soon!!!!
Supplies:


4 comments:
Thank you for writing this quality informational content. Your writing technique is impressive and enjoyable to read. If you want about web Development company services in india.
Post a Comment