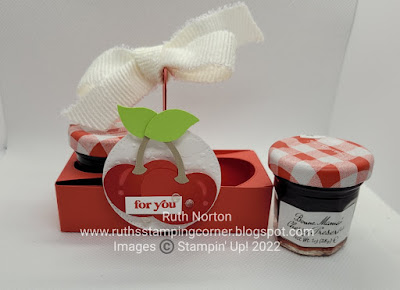
I'm back today with an adorable cherry treat! I absolutely love this cherry punch and with so many cherry treats you could create for days with it! I also shared this tote bag last week that I made with the Sweetest Cherries Bundle. Today I'm only using the punch but you can use the stamps as well. If you love cherries the bundle is a must have.
Today I'm sharing a caddy box. I designed this to hold two mini jars of cherry jam. There's a handle in the middle to carry like a caddy. It's not too heavy but I would definitely use cardstock to build the box not DSP. Each side will hold one jar. This gift isn't cheap. I found these little jars on Amazon and bought them specifically to make this. If you make your own cherry jam or have another supplier this might be more cost effective. Otherwise I think this would make a really cute gift for someone really special. Maybe if you're traveling and visiting friends/family this would be a cute hostess gift. Camp counselor, teacher or just your super special cherry loving friend!
My stamping is minimal on this box, but you can always stamp the cherries. My only stamping is the greeting. I used the Simply Fabulous Set. I just LOVE the greetings in that set! You get a good variety too. My cherries are punched with Poppy Parade, Parakeet Party and Crumb Cake Cardstock. I added extra dimension on my cherries by inking them with a Blending Brush and some Poppy Parade Ink. I added a little shine to them with a Blender Pen and some White Ink.
Let's talk about the box. For this box I highly encourage you to check out the video. You can make this box with two 6" x 4" pieces or one 12" x 4" piece. I'm making it with two pieces because I didn't have any 12" x 12" Poppy Parade on hand. In the video I'll share how to do it with the 12" x 4" piece. The steps are similar, you're just not going to adhere the two boxes together. Both measurements are below if you want to create the larger one. If you only wanted to give one jar of jam as a gift you can just create one of the 6" x 4" boxes.
Below I've shared a picture of how to cut the two 6" x 4" pieces and where to apply your Tear and Tape. If you were making the 12" x 4" version yours would look the same but instead of being separated in the middle there would be a score line. Remember to check the video for all the details.
6" x 4" two pieces
On the short side score at 1" on each side
On the long side score at 1", 3"
Also on the long side mark at 4" stopping at the horizontal score line. Flip cardstock and repeat for the other side stopping at the horizontal line.
12" x 4" one piece
On the short side score at 1" on each side
On the long side score at 1", 3", 6", 9" and 11"
Also on the long side mark at 4" and 8" stopping at the horizontal score line. Flip cardstock and repeat for the other side stopping at the horizontal line.
Jar holder insert (same for both designs) two pieces
1 15/16" x 4"
On the long side score at 1" and 3"
Check my video for all the details. Make sure to subscribe to my YouTube Channel so you never miss a video. I have a full supply list below, you can shop for these products in my Online Store.
Thanks for looking, see you soon!!!
Supplies:
Retired: Corner Rounder, 1/2" Circle Punch


No comments:
Post a Comment