Monday, May 31, 2021

June Card Crate-What's Cookin'

I am happy to announce a new way to do classes with me!  Welcome to Card Crate!  The class that comes to your door and you can do your projects on your time from the comfort of your home.  Read on for all the details!


Card Crate is $35 (includes shipping!)


You'll get:

  • Supplies for your projects
  • A PDF with all the supplies and photos of projects
  • $20 in product, needed to complete your cards
  • A Thank You gift from me
  • Video Tutorial


What you'll need:
  • Stamps and ink to complete your projects, per Stampin' Up! policy all projects will come unstamped (you'll know in advance what the supplies are so you can plan ahead and place orders if you need to).  There's always room to substitute items and be creative if you don't have the exact supplies!
  • Adhesive, some months may contain specialty adhesive.
  • Scissors
How to purchase:
Email me and let me know you want the June Card Crate and I'll send you a link to pay via PayPal.  Per Stampin' Up! Policy I cannot list the 'buy now' button on my blog.
Please email me if you want the Card Crate stamperrdn@q.com

Last day to RSVP for June's Card Crate is June 13.  All supplies will be ordered on June 14 and classes will ship by June 24.  (Time between ordering and shipping is longer due to longer expected shipping from Stampin' Up!, I hope to have them out sooner but I'm overestimating on timelines to be safe.)  You will receive an email with your PDF when all crates have shipped. 


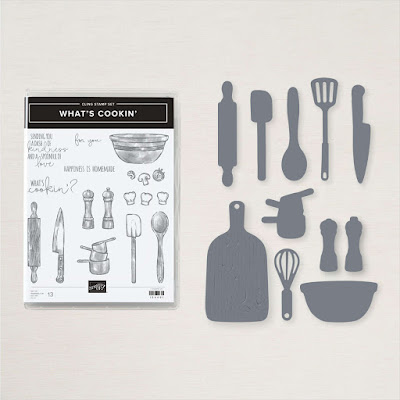
This months kit is so much fun!!!  It features 4 incredible cards!  I'm featuring the What's Cookin' Bundle.  Add on the What's Cookin' Bundle to your Card Crate for only $45.75 and I'll pay the tax and shipping on it!!  Make sure you indicate that you'll need the bundle when your RSVP for Card CrateNOTE: You WILL need the dies to create the projects. 


This month's Card Crate you'll make 4 cards. The cards are so cute and so much fun. I love them!

What you'll get in this month's kit:

  • Supplies for your 4 projects
  • Full Package of Vellum Doilies
  • Full roll of Bumblebee Gingham Ribbon
  • Full package of In Color Square Gems
  • PDF Instructions with photos
  • Video tutorial
  • Free Gift

What you'll need to complete this month's kit:

* VersaMark, White Embossing Powder and Heat Tool can be substituted for Black Memento Ink if you don't have those supplies  

All other supplies for your cards will come in your kit.  Your kit may contain die cut, pre punched or pre dry embossed pieces.  You will need to supply all stamps and inks to complete your project.  If you don't have the supplies listed above you can place an order to get them or you can substitute what you do have.  There is always room for to be creative.  

If you have any questions please let me know.  I hope you enjoy this month's Card Crate!! 


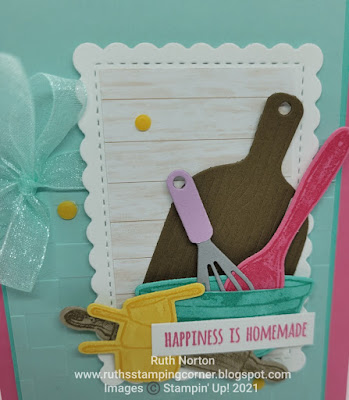
Happiness Is Homemade

I recently did a card swap with a few of my team members.  A card swap is where you make multiples of one design then you gather others who have done the same and you swap cards, you leave with lots of different sample to inspire you!  This was the card I made for the swap.  This What's Cookin' Bundle caught my eye immediately in the catalog.  It's one of my favorites for sure!!!

stampin up, what's cookin

Doesn't this just look like the most fun kitchen ever!!  I'd love to have super colorful baking tools.  I do have lots of colorful tools in my kitchen but they're not as cute as this card.  The dies in the bundle not only coordinate with the images in the set but there's also some stand alone dies too like the whisk and cutting board.  I used the Check Embossing folder from the Checks and Dots set.  I thought that was a great kitchen-y background.  I tied in some cute Pool Party Ribbon and Enamel Dots to finish the card. 

Don't miss my next team swap-join my team today! It’s a fabulous time to join Stampin’ Up! Right now when you join you get even MORE FREE products in your customizable Starter Kit. From 4–31 May, new team members can get $125 USD  $155 USD worth of products for only $99 + free business supplies + free shipping + a free Paper Pumpkin + all the fun being a part of Stampin’ Up! and my team!  It's a great time to join and if you have a long wish list why wouldn't you join!?!  Join my team here!  HURRY this deal ends TODAY!!!! 

I have a full supply list below, you can shop for these products in my Online Store.  

stampin up, what's cookin

Thanks for looking, see you soon!!!!

Supplies:

 SHOP MY ONLINE STORE Use Host Code EWWJDNQB
All orders will receive a FREE PDF from me with 3 projects to inspire you!  
Orders over $50 will receive a make and take kit for the 3 projects featured in the PDF.  
Make and take kits will be mailed weekly as orders arrive.  
You will need to provide stamps and ink for your projects. 

Don't miss this month's amazing Join+ Promotion.  It’s a fabulous time to join Stampin’ Up! Right now when you join you get even MORE FREE products in your customizable Starter Kit. From 4–31 May, new team members can get $125 USD  $155 USD worth of products for only $99 + free business supplies + free shipping + a free Paper Pumpkin + all the fun being a part of Stampin’ Up! and my team!  It's a great time to join and if you have a long wish list why wouldn't you join!?!  Join my team here!

Friday, May 28, 2021

Stampin' Blends Marbled Technique-Multiple Cards

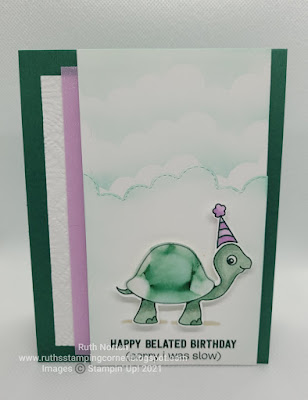
Today I'm sharing another fun technique that I shared with my team recently.  This one is pretty amazing!  It makes you look like an amazing artist!  Who doesn't want that?  I made four cards as samples with this technique, I loved it sooo much and got a little crazy.  I have supply lists for each card listed below.  Shop products from your favorite card(s).  I'm not sure of the name of this technique.  I'm calling it the Stampin' Blends Marbled Technique but that's a mouthful! The supplies you'll need for this technique is Vellum Cardstock, Stampin' Blends and some alcohol. (The stuff you get from the pharmacy, the higher the alcohol content the better.  Mine was 91%).

stampin up, Biggest wish, stampin blends, alcohol marbled technique

I've seen this technique all over, I'm not sure who the original creator is.  To create this look, using your Stampin' Blends color scribbles on your vellum.  Just scribbles, there's no artistic talent needed.  Choose some colors that will blend well together. Once your scribbles are done, add some of the alcohol.  I used a paint brushed dipped in the alcohol, you could also fill a water painter or spritzer to add the alcohol.  The bottom line is you gotta add the alcohol to get the ink from the Stampin' Blends moving.  

stampin up, sweet as a peach, stampin blends, alcohol marbled technique

Once you add the alcohol the color will begin to move.  Don't add to much though or your vellum will warp and the color will all run off.  I used my wet paint brush and just dabbed all my scribbles.  The colors move and blend together and it's so pretty!!!!  Since it's alcohol it will dry quickly, just a couple of minutes.  Once dry you can cut, die cut, punch or do whatever you want to your marbled vellum.  All of my pieces are backed with some Basic White Cardstock.  You need to put a color behind it to really make the colors pop.  

stampin up, artistically inked, expressions in ink, stampin blends, alcohol marbled technique

If you want to really set up your marbled piece you can add some gold foiling.  For this card, after my marbled background was dry, I used my Tombow liquid glue and added some squiggles and swirls with my glue.  Let dry completely.  Tombow when dry will remain a little tacky even dry.  Once dry I added the Gilded Leafing and was in love with the final look!  

stampin up, turtle friends, stampin blends, alcohol marbled technique

I'd love to have you join me at my next team event.  It’s a fabulous time to join Stampin’ Up! Right now when you join you get even MORE FREE products in your customizable Starter Kit. From 4–31 May, new team members can get $125 USD  $155 USD worth of products for only $99 + free business supplies + free shipping + a free Paper Pumpkin + all the fun being a part of Stampin’ Up! and my team!  It's a great time to join and if you have a long wish list why wouldn't you join!?!  Join my team here!

Thanks for looking, see you soon!!!

Supplies for 'Rainbow Happy Birthday' card:
Rubbing Alcohol 91%
Paint Brush

Supplies for 'Peachy Day' card:
Rubbing Alcohol 91%
Paint Brush

Supplies for 'Thanks' card:
Rubbing Alcohol 91%
Paint Brush

Supplies for 'Belated Birthday' card:

 SHOP MY ONLINE STORE Use Host Code EWWJDNQB
All orders will receive a FREE PDF from me with 3 projects to inspire you!  
Orders over $50 will receive a make and take kit for the 3 projects featured in the PDF.  
Make and take kits will be mailed weekly as orders arrive.  
You will need to provide stamps and ink for your projects. 

Don't miss this month's amazing Join+ Promotion.  It’s a fabulous time to join Stampin’ Up! Right now when you join you get even MORE FREE products in your customizable Starter Kit. From 4–31 May, new team members can get $125 USD  $155 USD worth of products for only $99 + free business supplies + free shipping + a free Paper Pumpkin + all the fun being a part of Stampin’ Up! and my team!  It's a great time to join and if you have a long wish list why wouldn't you join!?!  Join my team here!

Thursday, May 27, 2021

DIY Washi Tape

Last week I share the Make and Take cards from my team meeting, you can check them out here and here.  This week I'm sharing some of the demos that I did.  I try to share some new techniques with my team for them to share with their customers or to use in their own crafting.  The first was a technique I saw Sara Douglas do.  Sara is Stampin' Up! CEO and I love her fun crafting style.  I had never seen this technique so I was so impressed and excited to share with my team.  

stampin up, color and contour, washi tape

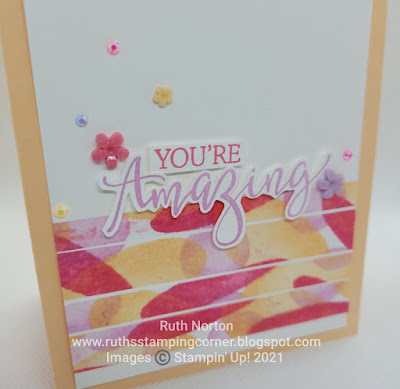
This technique is easy and packs a punch.  All you need is our Adhesive Sheets and some tissue paper.  Adhere the tissue paper to the adhesive sheets.  Stamp on your tissue paper all you want.  We have so many stamps and colors think of all the amazing washi tape you can make!  After stamping, trim your tissue paper to strips or die cut or do whatever you want with the washi tape.  When you're ready to use it, peel off the back of your adhesive sheet and apply to your project.  It's so cool!  Not only does it give the look of washi tape but the texture is so fun!  

stampin up, color and contour, washi tape

If you want to see Sara's video on how to make your washi tape you can check it out here. I shared two cards using this technique with my team.  I'll have a supply list for both cards listed below.   You can shop for these products in my Online Store. 

stampin up, watercolor shapes, washi tape

Both cards have a different look to them but they both feature the DIY washi tape as the star of the show.  I hope you give this technique a try.  It's so much fun!!  

I'd love to have you join me at my next team event.  It’s a fabulous time to join Stampin’ Up! Right now when you join you get even MORE FREE products in your customizable Starter Kit. From 4–31 May, new team members can get $125 USD  $155 USD worth of products for only $99 + free business supplies + free shipping + a free Paper Pumpkin + all the fun being a part of Stampin’ Up! and my team!  It's a great time to join and if you have a long wish list why wouldn't you join!?!  Join my team here!

stampin' up, watercolor shapes, washi tape

Thanks for looking, see you soon!!!!

Supplies for 'THANKS' card:
Tissue Paper

Supplies for 'You're Amazing' card
Tissue Paper


 SHOP MY ONLINE STORE Use Host Code EWWJDNQB
All orders will receive a FREE PDF from me with 3 projects to inspire you!  
Orders over $50 will receive a make and take kit for the 3 projects featured in the PDF.  
Make and take kits will be mailed weekly as orders arrive.  
You will need to provide stamps and ink for your projects. 

Don't miss this month's amazing Join+ Promotion.  It’s a fabulous time to join Stampin’ Up! Right now when you join you get even MORE FREE products in your customizable Starter Kit. From 4–31 May, new team members can get $125 USD  $155 USD worth of products for only $99 + free business supplies + free shipping + a free Paper Pumpkin + all the fun being a part of Stampin’ Up! and my team!  It's a great time to join and if you have a long wish list why wouldn't you join!?!  Join my team here!

Wednesday, May 26, 2021

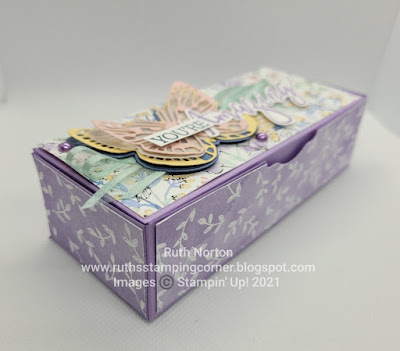
Brilliant Butterfly Box-VIDEO

Today's sweet box is soooooo beautiful and there's a yummy treat inside too.  I'm using lots of new stuff on this box!  I'll try to mention it all.  I shared this box in my weekly Facebook Live.  I go live every Wednesday at 3pm MT to share a cute project with you.  This week, due to a schedule conflict I had to go live on Tuesday instead.  Otherwise you can catch me every Wednesday at 3pm MT on my Facebook Page  

stampin up, create with friends, brilliant wings

This box is designed for the little cakes inside but it's a great sized box and you could put lots of other things in there too.  I used the new Hand Penned DSP for the sides and top of my box.  This is one of my favorite DSP's.  The patterns are gorgeous!  In addition to the DSP, I layered up butterfly die cuts from the Beautiful Wings Dies.  You can bundle these dies with the Brilliant Wings Set (which I recommend!) Today we're only using the dies.  I die cut butterflies from Misty Moonlight, So Saffron, Vellum and Blushing Bride Cardstock.  Then they're layered together for a spectacular look!   

To make the box you'll need a piece of cardstock that is 8 1/2" x 8"
On the 8 1/2" side score at 1 1/2" on each side
On the 8" side score at 1 1/2", 3 3/4", 5 1/4" and 7 1/2"
DSP
Top: 5 3/8" x 2 1/8" 
Front: 5 3/8" x 1 3/8"
Sides (2): 2 1/8" x 1 3/8"

Check out the video for details on assembling the box.  

stampin up, create with friends, brilliant wings dies

I used the new Create With Friends Set for the greeting.  Yes I fussy cut the 'amazing'.  If you didn't want to fussy cut or may you have to make a bunch of these I would just stamp the greeting on a tag or banner then add the stacked butterflies on top of the tag.  Finally to finish it off I used some new Soft Succulent Ribbon, weaved back and forth behind the butterfly.  The entire thing is finished with some Pastel Pearls.  Gorgeous!  

stampin up, create with friends, brilliant wings dies

To open the box I used the Label Me Lovely Punch to add a little finger notch.  We no longer sell circle punches which I think are all our our go tos for finger notches.  Instead I used the Label me Lovely and I have to say the elegant look it gives the box is pretty spectacular!  Inside the box are these cute Little Debbie Butterfly Cakes.  I found these at my local Target.  If you want to see if they're in your area you can check out the Little Debbie Snack finder.  Choose your snack (these are under 's' for Spring Butterfly Cakes).  If you can't find these cakes, there's plenty of treats you can put in this box.  I have a full supply list below for you, you can shop for these products in my Online Store.  

stampin up, create with friends, brilliant wings dies

Thanks for looking, see you soon!!!
Supplies:

SHOP MY ONLINE STORE Use Host Code EWWJDNQB
All orders will receive a FREE PDF from me with 3 projects to inspire you!  
Orders over $50 will receive a make and take kit for the 3 projects featured in the PDF.  
Make and take kits will be mailed weekly as orders arrive.  
You will need to provide stamps and ink for your projects. 

Don't miss this month's amazing Join+ Promotion.  It’s a fabulous time to join Stampin’ Up! Right now when you join you get even MORE FREE products in your customizable Starter Kit. From 4–31 May, new team members can get $125 USD  $155 USD worth of products for only $99 + free business supplies + free shipping + a free Paper Pumpkin + all the fun being a part of Stampin’ Up! and my team!  It's a great time to join and if you have a long wish list why wouldn't you join!?!  Join my team here! 

Monday, May 24, 2021

Peekaboo Farm Easel Card

I have another adorable card to share today!  I'm using the Peekaboo Farm Set for this card because those little animals are too cut to resist.  I started by making a Z-Fold card with this card but then it morphed into an easel card that I think I love even more!  The Z-Fold is 8 1/2" x 5 1/2", on the long side scored at 2 1/8" and 4 1/4".  Fold your cardstock to make a Z.  I added DSP ( 5 1/4" x 1 7/8") from the You're a Peach DSP to the top panel of the base.  The bottom panel needed a little more so I cut a piece of Flirty Flamingo Cardstock that is 5 1/2" x 2 1/4". I embossed it with the dots folder from the Checks and Dots Embossing Folder Set.  

stampin' up, peekaboo farm, zfold card, easel card

The added embossed cardstock on the bottom of the card will make this an easel card holding up those cute critters!  Speaking of them, I stamped them in Memento ink.  I stamped the wall twice, it's easy to line up.  Then I stamped two of the cute farm animals.  The hardest part of this card is choosing which animals to use! They're colored with Stampin' Blends.  Flirty Flamingo for the pig and Cinnamon Cider for the horse.  For the wall I colored it with Gray Granite and added lots of dark details on the bottom of each rock.  

stampin' up, peekaboo farm, zfold card, easel card

I die cut some clouds from the Give It A Whirl Dies and used a Blending Brush with Balmy Blue Ink to add some detail around the outside of them.  Add some Linen Thread for a fun bow and attach the entire thing to your card.  TIP-only add adhesive on the top half or you'll glue your cad shut.  I simply love this card!!!  I have a full supply list below.  You can shop for these products in my Online Store.  


Shop my Online Store.
Thanks for looking, see you soon!!!!

Supplies:

Shop here. Use Host Code EWWJDNQB
All orders will receive a FREE PDF from me with 3 projects to inspire you!  
Orders over $50 will receive a make and take kit for the 3 projects featured in the PDF.  
Make and take kits will be mailed weekly as orders arrive.  
You will need to provide stamps and ink for your projects.  

Don't miss this month's amazing Join+ Promotion.  It’s a fabulous time to join Stampin’ Up! Right now when you join you get even MORE FREE products in your customizable Starter Kit. From 4–31 May, new team members can get $125 USD  $155 USD worth of products for only $99 + free business supplies + free shipping + a free Paper Pumpkin + all the fun being a part of Stampin’ Up! and my team!  It's a great time to join and if you have a long wish list why wouldn't you join!?!  Join my team here!