Wednesday, July 31, 2013

Birthday Flower

I have a super duper quick post, two in a row I know!  This card is also super quick so it works out!  For the background I used 3 stamps.  I used the new Dictionary stamp, I first stamped it on scratch paper then on my cardstock so it's not so 'intense' then I stamped the flourishes from the Everything Eleanor set and finally I pulled out my Gorgeous Grunge splatter.  All stamped in Smoky Slate.  Isn't that the best grey! 
For the flower I stamped it twice in Strawberry Slush, punched them out and then punched 2 extra flowers in Strawberry Slush cardstock.  Stack 'em up and put a brad through them.  That's pretty much it.  I told you super simple! 
Thanks for looking, see you soon!!!!

Tuesday, July 30, 2013

Disney.....The First Of Many


I've slowly began the HUGE task of scrapbooking our Disney trip.  Of course that means I'm months behind on our everyday pictures :)  We started our trip at Animal Kingdom these are a couple of the pages I have from that park so far.  I love this Safari page.  It's simple but the colors all look great together. The tape works well and my favorite is the title over the pictures.  I love that look! 
The next page is our first character sighting.  Little did we know Megan wouldn't be a fan of the characters, at least not up close :)  She did warm up to the characters by the end of the trip.  This page is super cute!  Hate to keep it short and sweet but it's one of those days :) 
Thanks for looking, see you soon!!!!

Monday, July 29, 2013

Beautiful Butterfly

I just LOVE this card!  Isn't it great?!  Some of the detail didn't photograph as well as I would have liked.  There lots of sparkle on this card.  On the bottom white piece I stamped some of the Gorgeous Grunge stamps (LOVE that set--it may never leave my desk!), after I stamped the I embossed them in Iridescent Ice Embossing Powder.  LOVE the sparkle it adds.  Then there's the little silver glimmer paper accents that add TONS of sparkle!  Great way to use those scraps!!!!  But lets get to the butterfly on this card!  I used the Butterfly Die to cut out 3 butterflies, 2 in Coastal Cabana and one in Whisper White.  Every layer is popped up on dimesnsionals so this butterfly is full popped up and ready to fly! 
 
The butterfly is stamped and embossed in black embossing powder.  I stamped it with the Beautifully Baroque stamp-another one that might make it's home on my desk :)  Even though I missed convention, Stampin' Up! did live stream a couple of the sessions and in one of the Pam Morgan (LOVE LOVE Pam!) had embossed a button on one of her samples.  I LOVED that look so I tried it out!  I dipped about half the button in my VersaMark pad then sprinkled it with embossing power.  I LOVE the final look!!!  Can't wait to do this in other colors!!!! 
Thanks for looking, see you soon!!!!!

Thursday, July 25, 2013

Now Is The Time!

This is the BEST time to join Paper Pumpkin!!!  If you've ever thought about it but weren't sure this is the time!  If you haven't heard of Paper Pumpkin it's a fun box of products that gets mailed to you every month. Not only does the box include fun stamps, ink and accessories but it also contains everything you need to complete that months project, precut and ready for you to assemble! Sometimes it is a stack of cards (who doesn't need that!), some months it is a 3-D item like a scrapbook, journal or this months fun birthday banner. It's a great 20-30 minute little stamping escape. But new subscribers can get Paper Pumpkin for only $10 for their first two months, shipping is included in that price so it's an amazing deal! After your first two months the price goes up to $19.95. You can cancel your subscription at anytime without penalty. To take advantage of the deal you have to sign up by August 31st. They're always sent around the 15th of every month.
Who is Paper Pumpkin for?
  • New Stampers-it's the perfect kit for people who are brand new to the stamping world!
  • Busy Stampers-since it only takes about 30 minutes to complete it perfect for the stamper on the go to make something quick, but still feeling very crafty!
  • Kids-do you have a crafty kiddo in your life, paper pumpkin is the perfect escape for them! Because everything is precut you don't have to worry about scissors or wasted paper!
  • Expert Stampers-because all the work is done for you, you can sit back and let your creativity take over, add on your own stamps and supplies there's no rules!
Remember Paper Pumpkin makes a GREAT gift, you can have it sent directly to your friend, daughter, sister, mother whoever you choose!
How do you sign up?  Head to the Paper Pumpkin website and get started!  Don't forget the promo code.  You'll need to add the promo code to get your first two months for only $10.  Add PUMPKINDEAL for your promo code and don't forget to add me for your demonstrator when you sign up. 
 

So why am I sharing this fun birthday card when this months Paper Pumpkin project is a banner?  Well I loved the little flags for the banner I didn't really *need* a birthday banner so I used the flags for a birthday banner on this card.  This month's card also came with three ADORABLE background stamps.  I used those for wrapping on the gift boxes.  Let your creativity run wild with Paper Pumpkin!  Sign up by August 31st and get the amazing deal!!!
Thanks for looking, see you soon!!!!

Wednesday, July 24, 2013

Magnet Love

Here is our final project.  I LOVE this project.  I originally created this board for Logan, yes I know it's pretty girly for Logan :)  Well it's going in the kitchen so I guess it's really for both of us.  Logan has been asking for more money, apparently he has lots of expenses as a 6 almost 7 year old :)  So I created this board as a type of 'chore chart'.  We'll put a different chore along with the amount of money he can earn in each clip.  He can choose the chore he wants then bring us the paper when he's done with the chore and if we feel it's been done well he'll get the money and a new chore will go up. 
Of course if the chore thing doesn't work I'll just attach cards I love to it!  Sorry for the blurry picture here, I hope you'll still get the idea of what we did.  We used the Washi Tape to cover the clothes pins and decorated them with the buttons, twine and pearls.  So cute and fun!! 
On the bottom for an accent piece we made some lovely little flowers.  These are so pretty and have so much texture!  Each flower is made with 5 scallop circles.  Look for a tutorial on how these were made next week :)  Are you wondering what we made the magnet boards out of, well they're actually metal burner covers that we covered with DSP.  I found them at the dollar store, they came with two in the package, a large one and a small one.  The dollar store is filled with fun projects just waiting to be created! 
Thanks for looking, see you soon!!!!

Tuesday, July 23, 2013

Wonderful Cards

Here's the cards that we made that went in the boxes.  I told you that everyone received buttons, washi tape, pearls and bakers twine for attending.  They used some of those items in for all of the projects For the first card we pulled out the buttons, twine and pearls.  Purely by coincidence we ended up using one of the same sets that the convention goers received.  Overall the card is fairly simple and came together quickly. 
The next card is my favorite card.  I love the fun greeting.  It's one of our new thinlit dies.  It will be available in the Holiday Catalog beginning August 1.  The chevrons are also new in the Holiday Catalog, they're from a really awesome new border punch.  The buttons and twine add a fun accent on this card.  Tomorrow I'll share the final project, I LOVE it!! 
Thanks for looking, see you soon!!!!

Monday, July 22, 2013

We Played Too!

Last week was SU's convention.  I wasn't able to attend this year after seeing all the fun updates I'm pretty bummed I missed it!  But it wasn't a total loss.  I invited some of the other demonstrators in our group who couldn't go to convention over for a fun night of stamping.  I created some fun projects for them and we had a wonderful evening of stamping, laughing, eating, laughing, talking, laughing, did I mention laughing?  One of the projects we made was this fun card box.  I saw one similar to this on Pintrest, however the directions were terribly confusing so I made my own version, MUCH easier! 
To keep the box closed I added a belly band, it's simple but you could always jazz it up :)  Everyone who came received a gift package, in it was a package of buttons, the gingham washi tape, bakers twine and pearls.  So if everyone wanted to they could have dressed them up.  It's hard to see in the picture but the Island Indigo cardstock is textured.
Once you remove the belly band, the front opens up and there's a box perfect for cards!  This would make the sweetest gift at a bridal or baby shower gift filled with Thank You cards.  Or what about a teacher gift?  Co worker gift?  So many options!
I bet you want to make one too right?  There's really easy, you'll be surprised how easy :)  The box and the front and back are two pieces.  First you'll make the box then the front and back.  The box is a piece of cardstock that's 11x6 1/4.  On the long side score at 5 and 6.  On the short side score at 1 and 5 1/4.  See the diagram below for further directions.  For the front and back you'll need 2 pieces 8 1/2 x 5 1/2.  You'll fold on the score lines and glue them together so that it makes a big U. 
To make the box, once you've scored the lines above, cut along the red lines on the left and right.  The small square tabs will fold up and the side adhere to each other creating your box.  Tomorrow I'll show you the cards that went in the box and Wednesday I share our final project. 
Thanks for looking, see you soon!!!!

Friday, July 19, 2013

Thankful Leaves

I have some new fun things to show you today!!!  Believe it or not Christmas is right around the corner!  That means that it's time for the Holiday Catalog to be released, we're just a couple weeks away from it's release on August 1!!  So you'd think with my big Christmas lead up I'd show you a Christmas card huh?  Not today!  I do have one in the works, we'll see how it comes out :)  In the meantime I have a fun fall or Thanksgiving card.  This new leaf, Magnificent Maple, is in there.  I love the mulitcolored look to the leaf.  Here's how I got it: 
I made my own 'spectrum' ink pad.  Remember waaayyyy back when we used to sell them.  Since we don't anymore I created my own and it's stinkin' easy to do!  I used a few baby wipes, stacked them and folded them to create a small ink pad.  Then I used some reinker, in this case I used Summer Starfruit, Tempting Turquoise and Elegant Eggplant.  I started with a couple drops of each but could clearly tell I would need to make my 'pad' larger to accommodate the size of my stamp.  So I kept adding color until I was pleased with it.  Then you just stamp like a regular pad.  FUN!!!
The greeting (isn't it fun!) is from the new Holiday Catalog too.  They're called Thinlits, they work just like our framelits do, but they're a little more intricate.  But they're still really fun!!!  Gotta run!!  I'm really excited.  I'm having some demonstrator friends over tonight, we didn't attend convention this year (happening right now!) so we decided that since we couldn't be there for whatever reason we're going to have our own fun.  So I created some FUN projects and we're going to have a fun evening of stamping!!!  Of course I'll share those projects next week with you ;)
 
Thanks for looking, see you soon!!!!

Thursday, July 18, 2013

Hip Hippo Ray!

 I have one last punched friend to show you today.  Every time I have a class I always give my guests a little gift to take home.  This time I did little bags of cookies.  Though that wasn't my original plan.  I made all the tags, the Wild Wasabi is cut with the Chalk Talk label, my plan was to attach them to our skinny cello bags.  I got pretzel rods and chocolate and make chocolate covered pretzels to put in the bags.  Well after the pretzels were dipped in chocolate they were too big to fit in the bags :(  So the cookies were plan 'B'. 
The hippos are super cute!  The 'Hip Hippo Ray For You' was just printed on White cardstock on the computer.  They're still cute, even though they're 'Plan B'  :)   I do love the little hippo.  I make about 20 of them in one night, so they're quick and easy to put together!!!
Thanks for looking, see you soon!!

Wednesday, July 17, 2013

Meet My Feathered Friends

Here are the final cards from my punch class.  No punch class is complete without some version of the owl punch.  The owl punch is one of those punches that you HAVE to own!  You can make a million things with him!  But for this class we kept him as an owl, just sent him back to the old west!  Here comes the sheriff owl coming through the saloon doors. 
He's stinkin' cute!  I love the huge cowboy hat!!!  His vest is layered with 3 layers of cardstock.  It just adds lots of dimension to him and in all movies I've seen those cowboys wear layers :)  We added some boots on him and his 'star' that makes him official!  You might notice that the backgrounds of my cards are pretty simple.  I do that on purpose with punch art.  I want the punch art to speak for itself.  So generally on all my punch art the card bases are kept really simple. 
Finally we have Mr. Bluebird.  I love him, because often punch art isn't huge, take the little owl for example, he's on one of our note cards, which are smaller than the standard card, so he's not a very big owl.  But this sweet bird is big, he takes up almost half the card. We use the 2 1/2 circle punch for his body and wings.  So he's a good size, which makes assembly so much easier! 
I just love him though, he's simple, but adorable!  He's easy enough to make a bunch of these in no time!  It's hard to tell from the picture but he's sponged in Pacific Point ink to add to the feathered look.  In real life it's easy to see and makes a huge difference. 
Thanks for looking, see you soon!!!!

Tuesday, July 16, 2013

It's More Than Just A Punch

Our Stampin' Up! punches are easy to use, fun and with a little imagination you can make the sweetest cards.  I'm always asked to do punch art classes.  I try to do 2 a year, they're pretty popular.  So this month's class was a punch art class.  First card is our sweet puppy card.  Isn't he just adorable!!!?!! 
He's super simple, made mostly of circles.  His nose and ears are the only non circles there.  Make sure you sponge darker ink on the lighter cardstock.  I know that sounds like such little step but that little ink can make the difference in texture and dimension. 
Speaking of the importance of sponging, I bring you to the next card.  This card required the fewest punches.  All we used was the new Hexagon punch.  But with creative sponging you can give the box shading, shadows and really makes it pop!  We used post it notes to mask portions of the box to get accurate shading. 
But this card wasn't complete until you added the little tissue box on the inside.  What a cute, fun card!!!  I was a little worried going into the class with this card, I thought it wouldn't be a favorite but it ended up being one of the most popular ones.  I think it's the hidden box inside :)  It's stinkin' cute!!!  I have a couple more cards to share tomorrow, so check back!
Thanks for looking, see you soon!!!!

Monday, July 15, 2013

The Tough Choice

Normally on the Monday's after a class I have tons of fun projects to share, don't worry they're coming tomorrow.  However today I have a much more pressing issue at hand.  I'm just starting (I know a month later!) our Disney Album.  Saturday evening I created two covers.  I created one and wasn't 100% pleased with it so I created another one.  Dan likes one I like the other (I'm not sharing who likes which one).  But we're torn.  So I'm reaching out to you for help.  Please comment on this post and let me know which you like better.  The top is the classic one, Mickey pants, simple.  The bottom is more fun and cute, also simple to put together.  So please take a second and let me know which one: top-classic or bottom-cute.  I have LOTS to share from my FUN punch class over the weekend!!  The cards were great and the company even better!!  Check back tomorrow and the rest of the week! 
Thanks for looking, see you soon!!!

Friday, July 12, 2013

A Colorful Blog Hop!


It's a really colorful blog hop this month!!  Our theme is New In Colors.  We all just love these colors so it was easy to create projects this month!  You might have just hopped over from Michelle's blog.  In that case Welcome!  If this is your first stop make sure you hop all the way through to see every one's creations.  For my card today, I was inspired by a card I saw on Pintrest, that had a similar layout.   I Incorporated all the incolors.  The four colors that make up the four butterflies are my favorite, though I love Crisp Cantaloupe I haven't pulled it out to use it much but I did use it for the 'splatter' on the card.  The splatter by the way was created using the stamp set Gorgeous Grunge.  LOVE that set!!!!  
The other In Colors featured on this card are of course: Strawberry Slush, Pistachio Pudding, Coastal Cabana and Baked Brown Sugar.  They coordinate so well with each other!!!  The butterfly image is from the Best Of Butterflies set in celebration of Stampin' Up!'s 25th Anniversary.  Of course no card of mine is complete without a few rhinestones.  Those that know me best know that :)   Well rhinestones and dimensionals :)
Now it's time to continue on the blog hop.  Next up is Amber.  She's sure to have something that will spark your creativity!!
 
Here's the line up in case you get lost along the way.
Ruth Norton YOU ARE HERE!!!
Thanks for looking, see you soon!!!!!

Thursday, July 11, 2013

Simply Beautiful

I've been working like a mad woman this week. In between getting ready for my class Saturday, taking Logan to camp everyday oh and cleaning up our backyard that was washed away in a huge rainstorm on Monday night.   I had planned to get in some MDSing this week, (I'm pretty behind on my scrapbooking) that didn't happen :) But I do have a great project for you.  This was our make and take at our meeting last week. Angela provided it and I just love it!!! It's simple, elegant and beautiful!  Make sure you check back tomorrow it's our blog hop. This month we're focusing on our new in colors.
Thanks for looking, see you soon!!

Wednesday, July 10, 2013

Pumpkin Love


I just LOVE Paper Pumpkin! I think that June's kit was the best one yet!  Yes I JUST put it together!  Just in time for a new kit :)  It's not too late to sign up for Paper Pumpkin, head to the website and sign up today and you'll get a kit mailed to you THIS month! If you sign up tomorrow or later your first kit won't come until August.  Remember if it's your first month with Paper Pumpkin you'll receive the welcome kit which includes an acryllic block to use with the rest of your kits. 
Aren't these four cards cute!!  I did add the twine and I used Pumpkin Pie and Primrose Petals ink instead of the ink that came with the kit.  But that's the great thing about it, you can customize it to what you want!  So don't wait any longer sign up today!  Seriously today, you don't want to have to wait a whole month to get it :)
Thanks for looking, see you soon!!!!

Tuesday, July 9, 2013

Coastal Butterfly

Ever make a card that perhaps you copied but just love your version so much, both are great but you love yours?  This is that card.  I used this card for my inspiration.  I loved it, it's simple but bold and so pretty!  But I knew I wanted to add some sparkle.  And I knew I was going to incorporate the ribbon somewhere else.  I LOVE ribbon, but I wanted this one to be mailable (even with the rhinestones, I'm pushing it).  So I knew that a big knot wouldn't work.  So instead I reached for our YUMMY ruffled ribbon!!  It's seriously the best ribbon ever!!!  Get used to me gushing about it, we have 2 years with this fab ribbon!  So after I cut the butterfly I just added the ribbon to the edge, it's subtle but looks so great in real life. 
 
The ribbon was done, I knew I'd be scattering rhinestones everywhere, I needed a background.  Plain cardstock was just that plain. Even stamped or embossed didn't give the look I was going for so I crumpled up my cardstock-literally!  I crumpled it, smashed it, squished it, rolled it until it was falling apart.  Once all the fibers in the cardstock were broken I was able to gently pull it apart giving me a faux suede look.  LOVE doing this to cardstock.  *NOTE: SU cardstock works great for this technique because it's thick and dyed all the way through, other thinner cardstock might not work.*  I splattered a little ink on it and it was done, the textured look was perfect!  There you have it.  Lovely isn't it?  This is one of my favorites! 
 
Thanks for looking, see you soon!!!!

Monday, July 8, 2013

Birthday Swaps

Our meeting was last week.  I'm finally getting around to sharing the swaps.  Did I mention it's been a busy summer already?  This week Logan is in a camp at the aquarium.  I'm sure it will be so much fun for him, and lots of driving for me :)  Here's our swaps from the meeting, the theme was birthday, you might remember my swap here
 
This is Kim M's swap.  This stamp set is so cute, and on my wishlist.  I love this color combo too, it's so rich!

This is Kay's swap, lots of new incolors on this card!  Plus the fun butterflies!!! 

This is Angela's swap, this DSP is so pretty it's Venetian Romance.  So many of the patterns just look painted!  So pretty.

This is Amber's swap.  Looks like this kitty is a popular one!  I love how Amber watercolored him. 

This is Karen's.  The shoe is embossed and just makes the card look so elegant! 
 
Thanks for looking, see you soon!!!!

Thursday, July 4, 2013

Rejected!

Well not really :)  I'm preparing for my Punch Art class in just over a week.  This class is always one of my more popular ones.  I always try to come up with fun new things that people might not have seen.  I ALWAYS make about 6 or 7 cards then narrow it down to the top 4 (with the helpful advice from a couple people).  The penguins didn't make the cut this time.  This would make the sweetest Valentine or Anniversary card though :)  I do love them, they are adorable!!!!  But the four cards that did make the cut are just as cute----maybe even a little cuter!!! 
Want more info on my punch class?  Here's all the details.  There's still time to sign up and attend!!! 
July 13, 2013 at 9:30am
Get Punchy With Me!
Back by popular demand! Come create cards featuring animals, or anything created using our punches (and maybe a die or two)! We have a few new punches with this catalog so it should be fun!!! This class is always popular so make sure you sign up early! You'll make 4 cards, this class is FREE with a $35 catalog order placed the day of the class or $20. Please RSVP by July 8th

On another note, have a very happy and safe Fourth of July to my US Friends!!!!

Thanks for looking, see you soon!!!!!

Wednesday, July 3, 2013

Faux Watercoloring

You know all those amazing cards out there with the beautiful watercolored background.  Well I've tried to do them and can't, they never come out just right.  Then while sitting at my desk one day staring at my markers and acrylic blocks it hit me, the best watercoloring technique ever!!!  I'm sure I did not create this, this is just my variation on it.  I've stamped with a blank acrylic block before, it gives a nice shadowed look.  But I've never colored my blocks........
That's right I used my markers and colored directly onto the block.  I stared with my lighter colors first, then blended them with my darker colors.  I used block E for this card.  Once your block is colored you can't just stamp it on your paper, not if you want the watercolored look.  I did this about 4 times before I got the desired look.  I started with shimmer spray (because wouldn't that be pretty) but it dries too fast.  Then I grabbed my stampin' mist-that's right it's for more than just cleaning!  (Side note: I'm sure plain water would work, but let's face it I'm a lazy stamper, the stampin' mist was there, the water was not.)  Once your block is colored, spray it with the stampin' mist, you want it to be pretty wet, not dripping, but wet enough to blend the colors.  Then immediately stamp it onto your paper.  Hold it for a few seconds, then carefully lift up.  Of course you'll need to set it aside to dry, or if you're in a hurry whip out your heat tool.  Once it's completely dry you can stamp your image over it.  I used staz on for mine.  Don't you just love the watercolored look!!!!  Finally don't forget to clean your block, make sure you get the maker and stampin' mist residue off or your stamps won't stick properly, next time you want to stamp.  Again I'm sure this is not my original idea, but it's super fun!!!!
 
Thanks for looking, see you soon!!!

Tuesday, July 2, 2013

Swappin' Birthdays


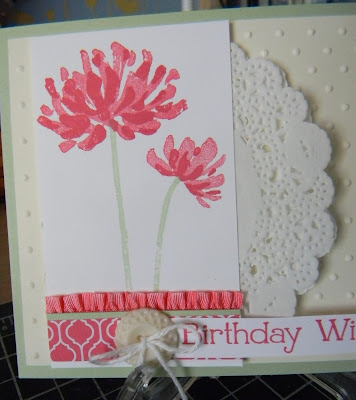
Tonight is our monthly demonstrator meeting.  I missed last month, so I'm really excited about this months!  They're so much fun, they're full of great ideas and it's so nice to get together with the demonstrators in our group and just catch up over the last month.  The swap theme this month is 'Birthday'!  I hear from my customers all the time, that birthday cards are always needed.  I used my new favorite flower set, Too Kind and my new favorite in colors (Strawberry Slush and Pistachio Pudding) and got to work!
I love love love that little ruffle of ribbon.  The doily is key too, the card looked a little incomplete without it.  Don't you just love the Vanilla and White together!!!?!  Finished with a sweet little button from the Very Vintage buttons.  Love it!!!  I'll have more swaps to share later this week! 
Thanks for looking, see you soon!!!